
DIY: Wood and wire 2-3 bin compost system
courtesy of the Saskatchewan Waste Reduction Council
Note: while the original blueprint details a 3-bin compost, it is easy to adapt the bin to have fewer or more
compartments.
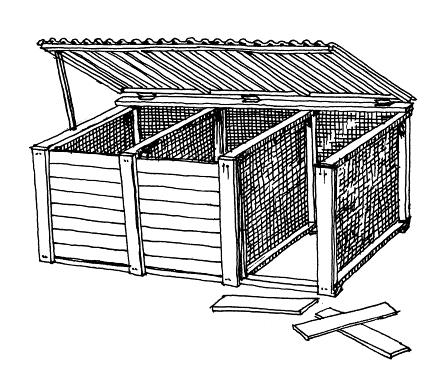
Composting in multi-compartment bins allows large amounts of material to be processed in batches. This design permits complete turning of a pile as it is transferred from one bin to another. It accommodates piles in different stages of breakdown. One bin can be used to store leaves or other materials for future use.
A very simple three-bin unit can be built with seven shipping pallets fastened together. This more elegant design uses four identical rectangular wooden frames bolted to common top and bottom rails and covered with a fiberglass lid. Metal mesh is used to cover the back, ends and dividers. It is adapted from a design developed for the Community Composting Education Program in Seattle, Washington.
Variations
This design allows a lot of air exchange, which can lead to piles drying out quickly in prairie conditions. The metal mesh on the ends and back of the bin can be replaced with one inch dimensional lumber, with one inch gaps between boards to allow some ventilation.
It is also possible to create a separate lid for each compartment, rather than one long one.
Materials
3 - 2”x4"x10' boards
4 - 2”x4"x12' board, or 8 @ 2”x4"x6' boards
5 - 2”x2"x10' boards
2 - 2”x2"x6' boards
9 - 1”x6"x6' boards
22' - ½" mesh hardware cloth (metal mesh), 36" wide
18' - 4-oz. corrugated fiberglass, 2' wide
3 - 8' lengths wiggle molding for fiberglass
2 - 3” zinc-plated butt hinges (plus twelve 1½" #8 screws)
12 - ½x4" carriage bolts (plus nuts & washers)
2 lbs. - 2½" galvanized siding nails
40 - gasketed aluminum roofing nails
4 - 4" flat corner braces (+ screws)
4 - 3” 'T' braces (+ screws)
carpenter's glue
Note: pre-cutting all components and painting with boiled linseed oil will delay decomposition of the wood frame without contaminating the compost it contains. Current pressure-treated wood is considered safe to use. If you'd prefer untreated wood, cedar is a good choice since it tends to be resistant to rot.
Tools list
tin snips or side cutters (for hardware cloth)
tape measure
carpenter's square
power drill or hand brace
1/8" and ½" drill or brace bits
crescent wrench or ¾" socket & driver
hand tacker or power stapler with ½" staples
Construction sequence
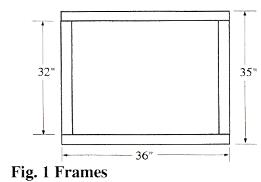
End and divider frames.- From 12' or 6' 2x4" stock, cut 8 pieces at 36" and 8 at 32".
- Butt-join with nails and glue into four 36" wide by 35" tall rectangles, as illustrated in Fig. 1.
- Cut four 37" lengths from hardware cloth stock and reinforce each edge by doubling back 1".
- Place doubled side towards wood frames and attach with staples spaced 4" apart, taking care to keep hardware cloth well tensioned and square with frames.
Main assembly
- Trim the three 10' 2x4"s as 9' rails.
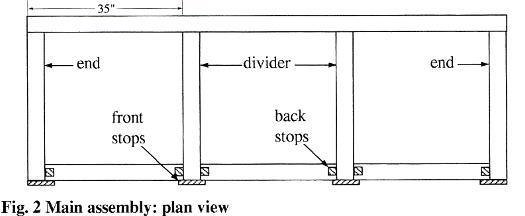
- Mark positions for outer faces of divider frames at 35" from each end, as shown in Fig. 2.
- Place two of the three rails flat on the ground with outside edges spaced 36" apart
- Stand each end frame vertical and flush with rail ends, hardware cloth on the interior face, and drill ½" holes through both frame and rail into a block of scrap.
- Feed a carriage bolt up through each hole, add washer, and hand-tighten nut.
- Repeat this procedure to attach both dividers; hardware cloth can face outward to make both outer bins match, or inward to make a compact centre bin.
- Add the remaining rail at the top and back side of this assembly, aligned as for bottom rails and fastened with carriage bolts fed downward into pre-drilled ½" holes.
- Adjust components to square in all directions, either with carpenter's square or by matching diagonal measurements across the top, then tighten all nuts with socket or crescent wrench.
Slats and stops
- Cut six 35" lengths from 10' 2x2" stock.
- Nail one of these lengths to each side of the front verticals of ends and dividers at 1" back from their front faces. These serve as back stops for each bin's removable front slats.
- Cut four 36" lengths from 6' 1x6" stock.
- Centre these on the front faces of end and divider frames and nail in place. These make the front stops of the slots in which the slats will be trapped.
- Cut eighteen 30½" pieces from 6' 1x6" stock to make sets of six sliding slats for each bin front. See Fig. 2 for a plan view of assembly to this stage.
Lid
Construction of a single lid for all three bins is described below, but three individual lids may also be made (with adjustments to materials list). Substitution of light plywood gussets for the listed metal corner and 'T' braces is also possible.
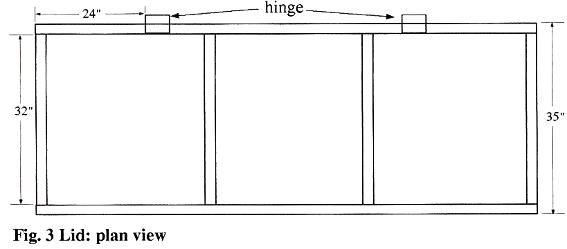
Cut remaining 2x2" stock as two 9' and four 32" pieces.
Assemble as 9'x35" rectangular frame, shown in Fig. 3. Check for squareness; fasten ends and sides with metal corners, and interior dividers with metal 'T' braces, using 1/8" pilot drill for screw holes to avoid splitting wood.
- Cut wiggle board moulding to match front and rear rails of lid frame. Tack or clamp in place.
- Cut five 37" pieces from fiberglass stock.
- Place fiberglass pieces on lid frame with channels aligned to the lid's short dimension, overlapping each piece by one channel or more.
- Pre-drill nail holes through fiberglass and into frame every third hump, and attach with gasketted nails.
- Mark and pre-drill screw holes for hinges in underside of lid's rear rail, then attach hinges.
- Have a helper support the lid while you pre-drill matching screw holes into top of upper main assembly rail, then attach lid.
For a printable of these instructions, click here. These plans are in the back of the report.