Rain gardens: a how to guide for a Healthy Yard
Brought to you by Gardening at the U of S, the City of Saskatoon, the Saskatoon Food Bank and Learning Center Garden Patch, and the Saskatchewan Waste Reduction Council Compost Coaches
What is a rain garden?
Rain gardens are garden beds that slow down and temporarily hold storm water runoff from your roof, driveway, or lawn. They include a variety of plants and are an easy, sustainable way to prevent pollution from entering our waterways.
Rain gardens provide many benefits. For example, they:
• Help reduce flooding and property damage;
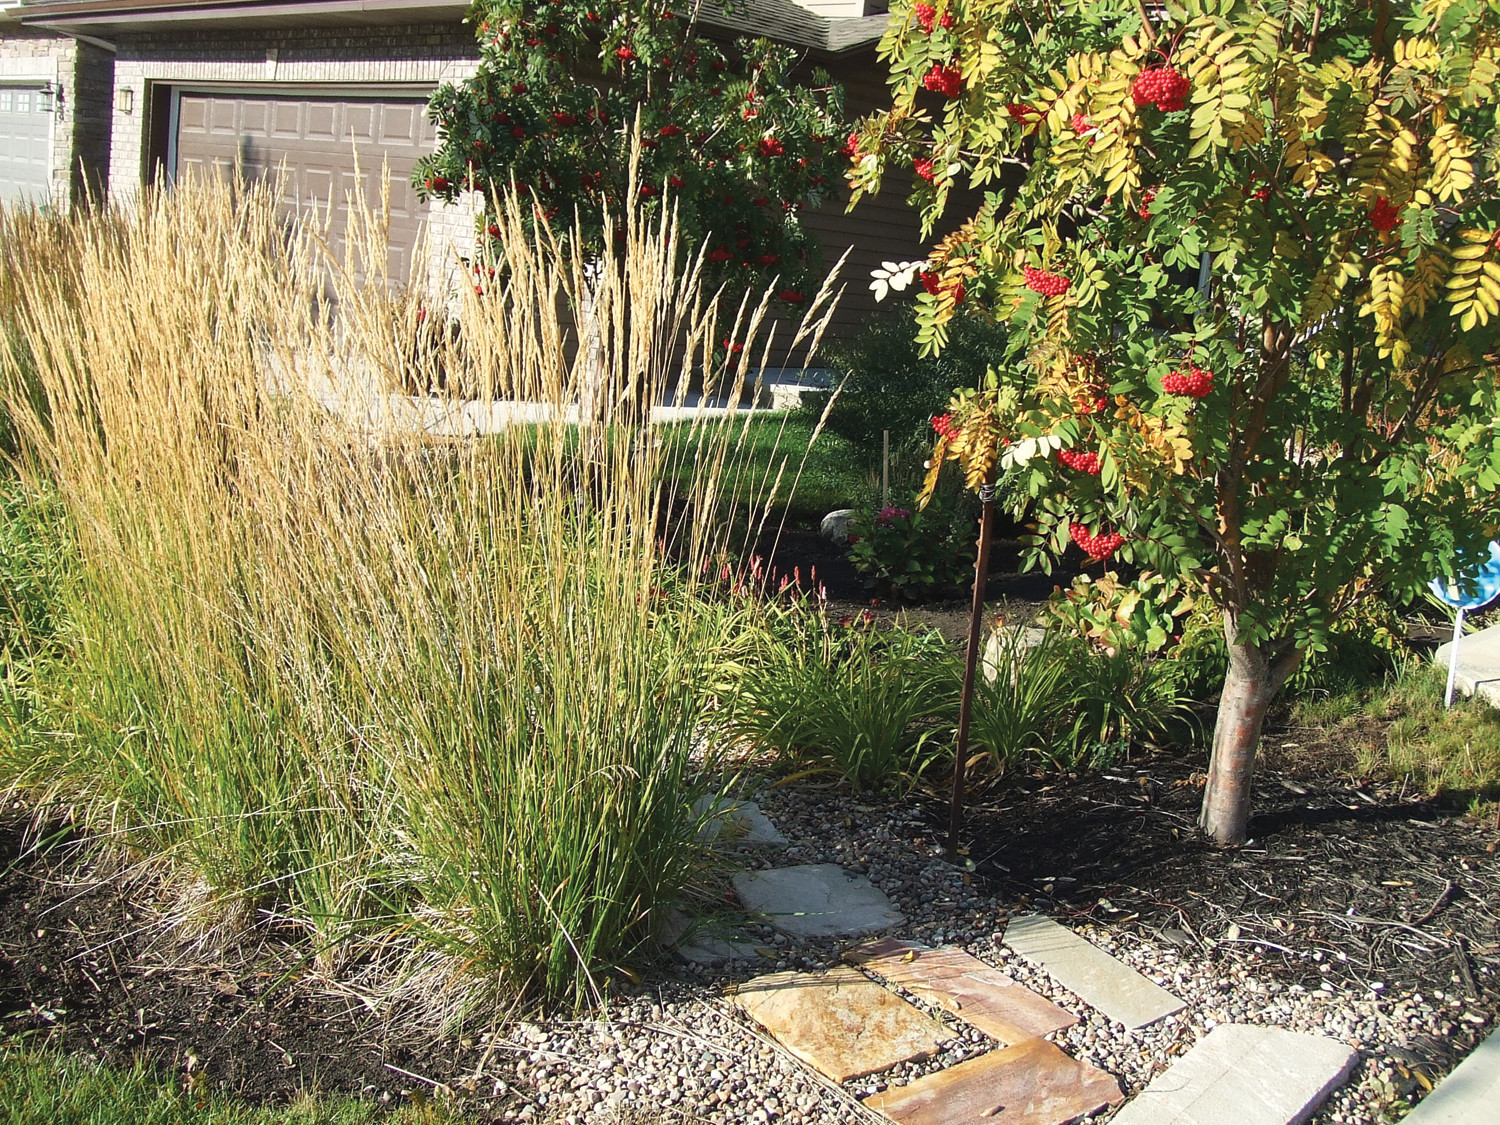
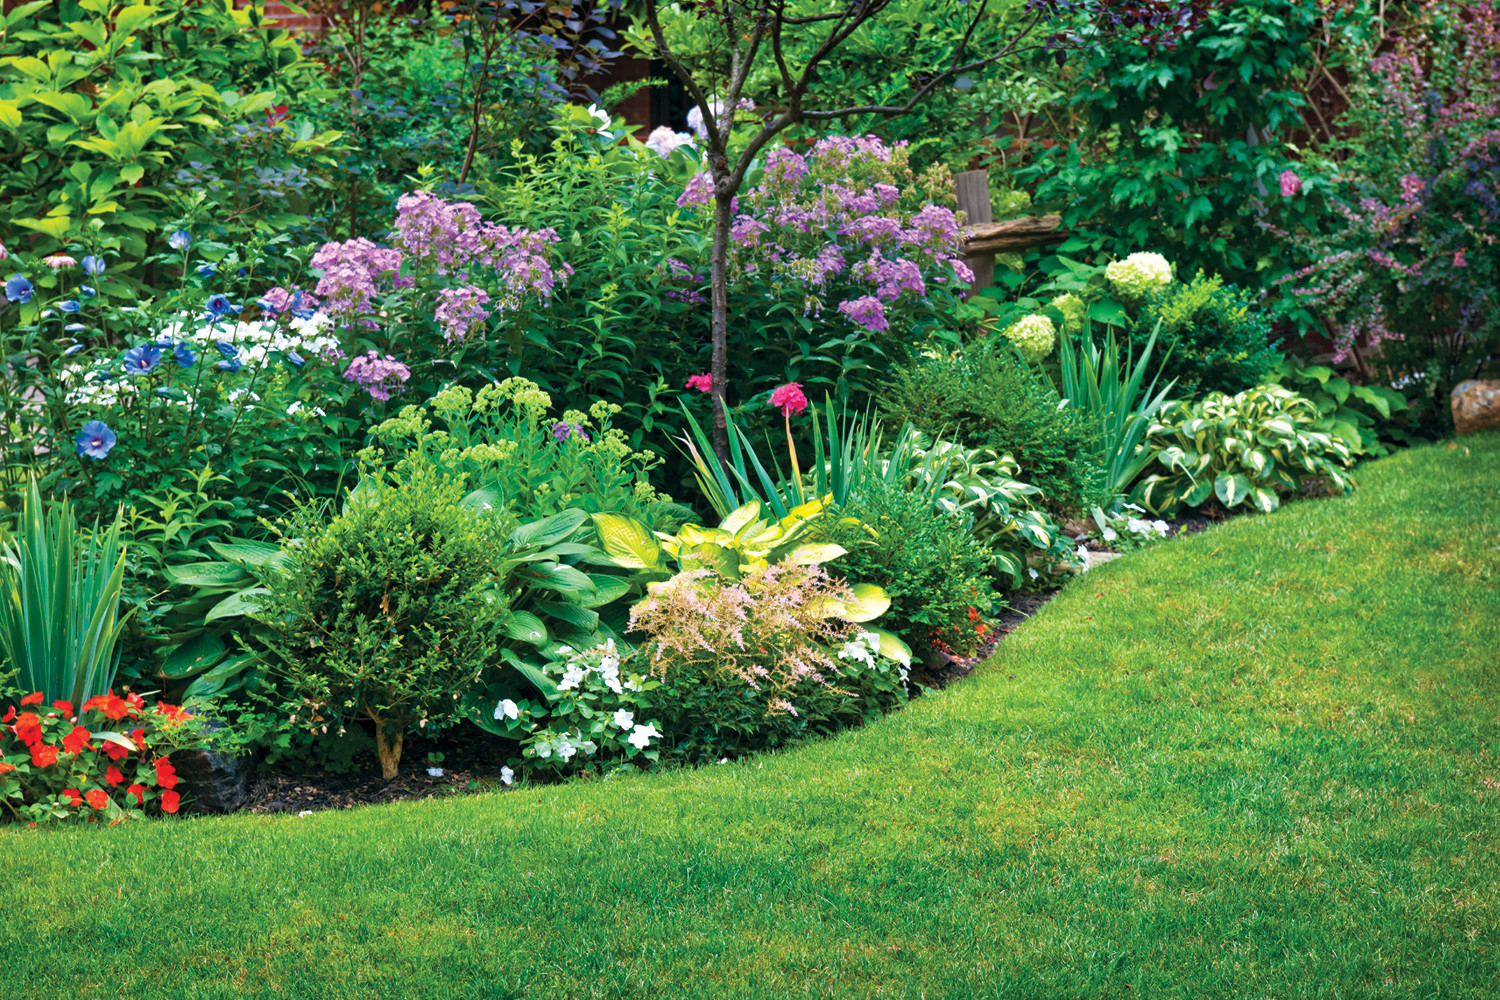
• Create beautiful alternatives to traditional lawns and garden beds;
• Remove pollutants from runoff before it enters our river and waterways;
• Support biodiversity;
• Provide food and shelter for important insects and birds;
• Slow down storm water flows;
• Recharge ground water; and
• Help protect water quality in downstream communities.
What is storm water?
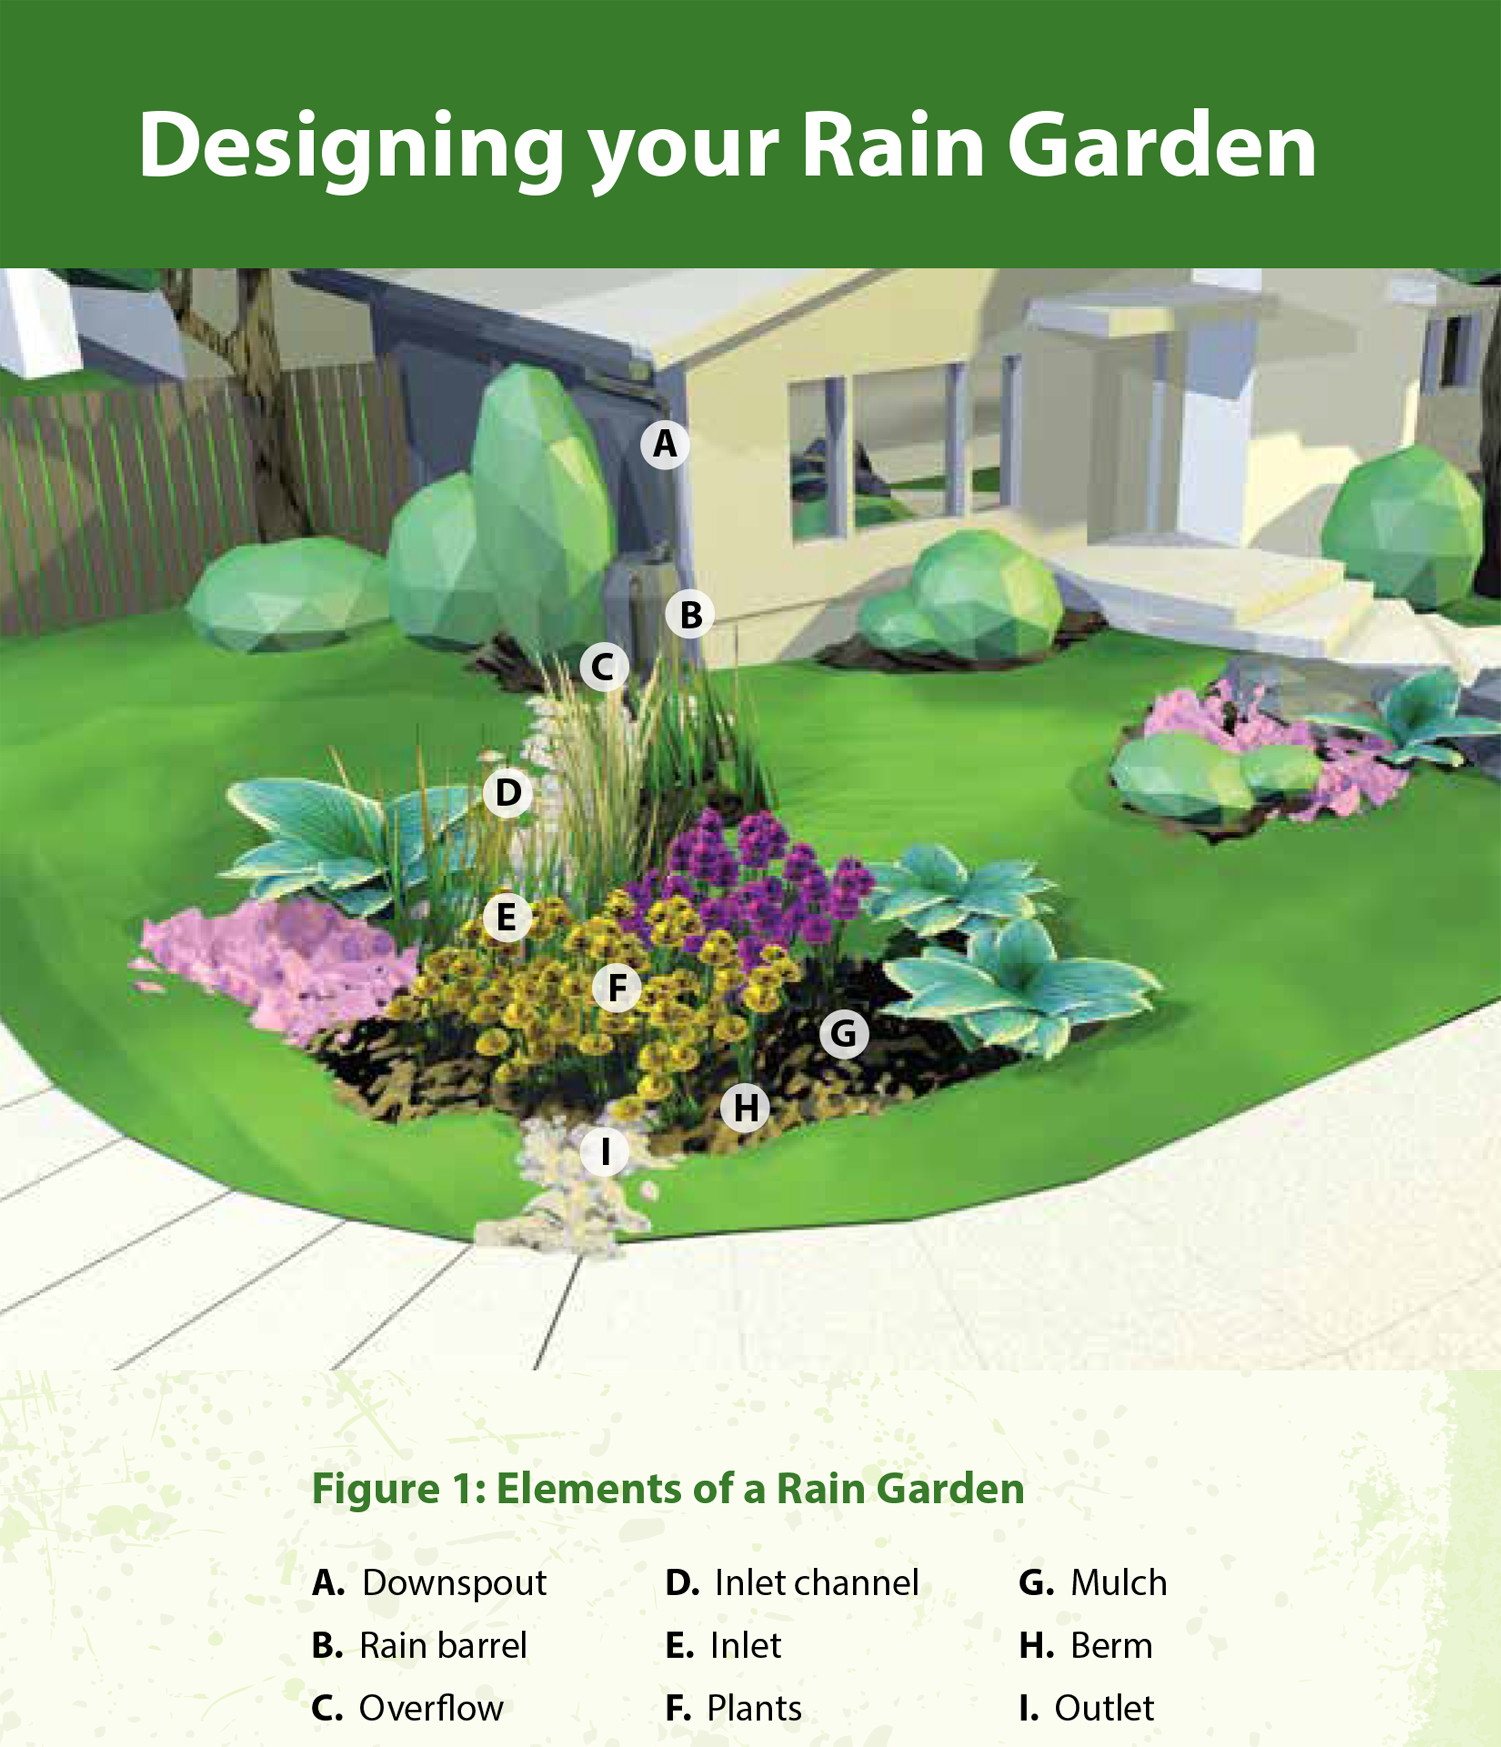
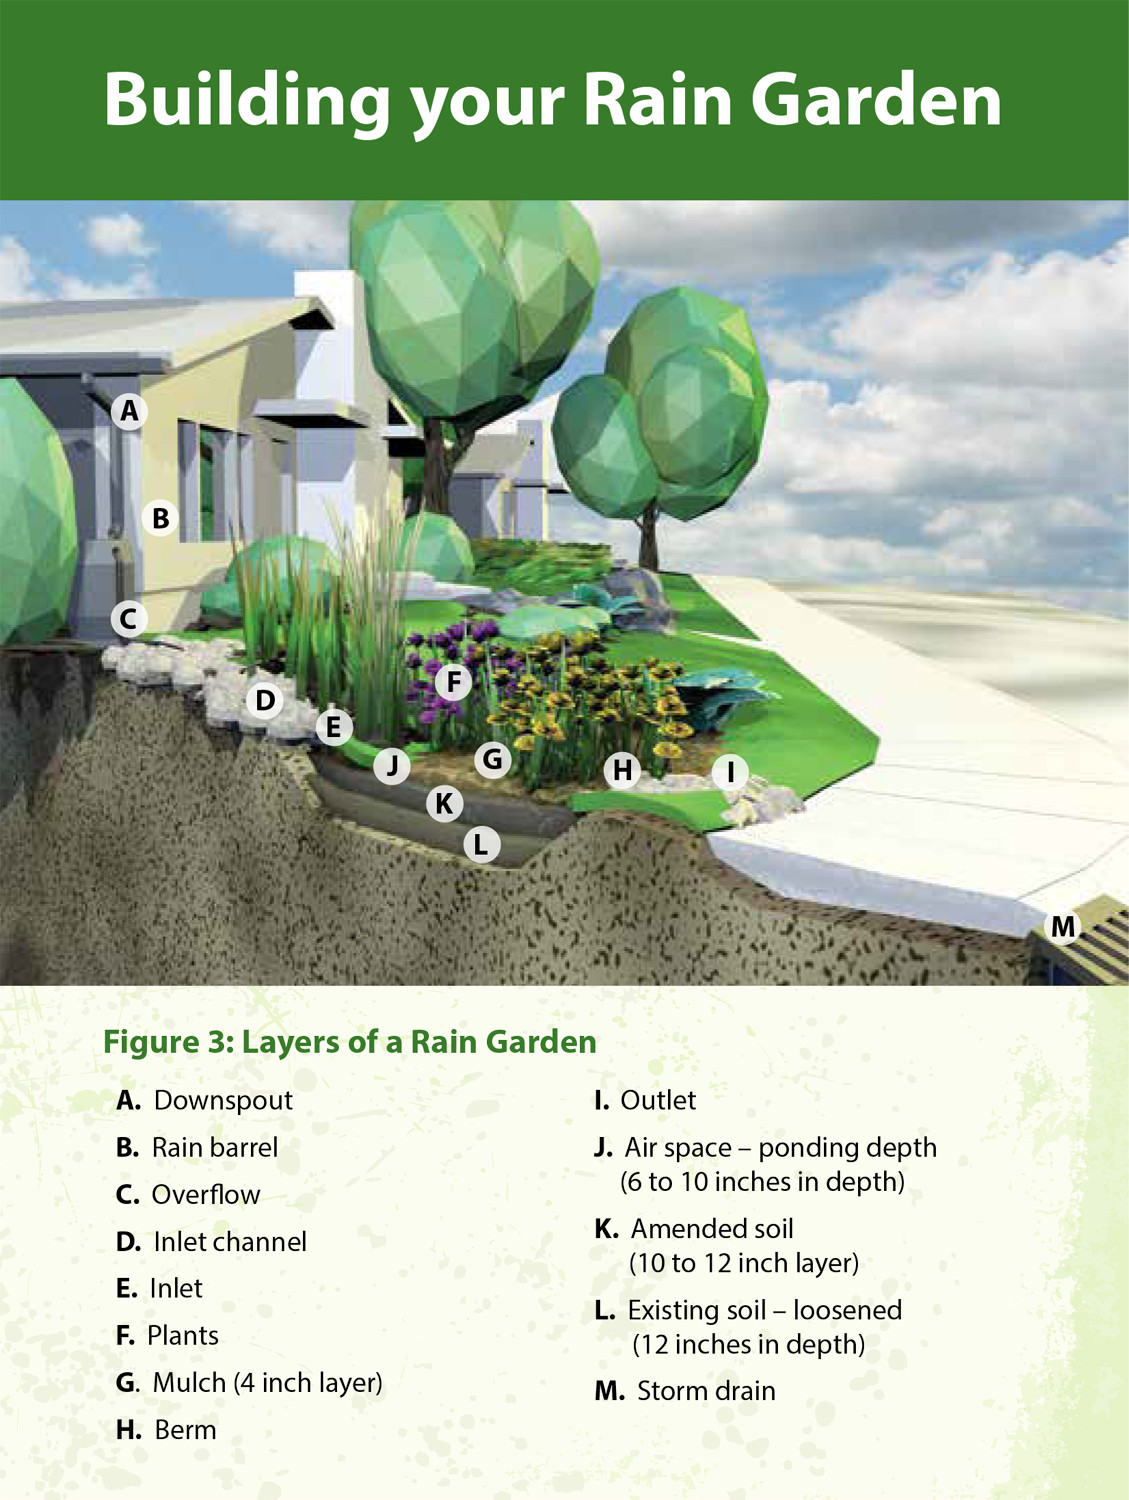
Anatomy of a Rain Garden
Size
When choosing the size of your rain garden, consider how much space you have in your yard, what your budget is, and how much runoff you would like your rain garden to hold. Although residential rain gardens are typically 5 to 15 feet wide and approx. twice as long as they are wide, you may choose any size that complements your yard.
To catch as much water as possible:
• The area of your rain garden should be a minimum of 5% of your drainage area (the portion of your roof, driveway, and/or lawn that drains into your rain garden).
• The depth of your rain garden should be approx. 20 to 26 inches deep from the top of your lawn surface to the base of your rain garden. See Figure 3 for details.
• The length of your rain garden should be perpendicular to the slope of your yard. This often means the long side will be parallel to your city sidewalk or back lane.
Shape
Rain gardens can be any shape. They are often long and narrow, but can be kidney-shaped, circular or rectangular as well.
Location
When determining where to locate your rain garden, make sure it is a minimum distance of:
• 10 feet away from all building foundations, such as your house and garage;
• 3 feet away from City rights-of-way, such as sidewalks and boulevards; and
• 6 feet away from neighbouring yards and property lines.
Your rain garden should not be located close to or over top of:
• underground utilities, sprinklers, or underground tanks;
• areas where water already ponds (this indicates poor drainage); or
• steep slopes (for stability reasons, rain gardens should only be built in areas with less than a 10% slope).
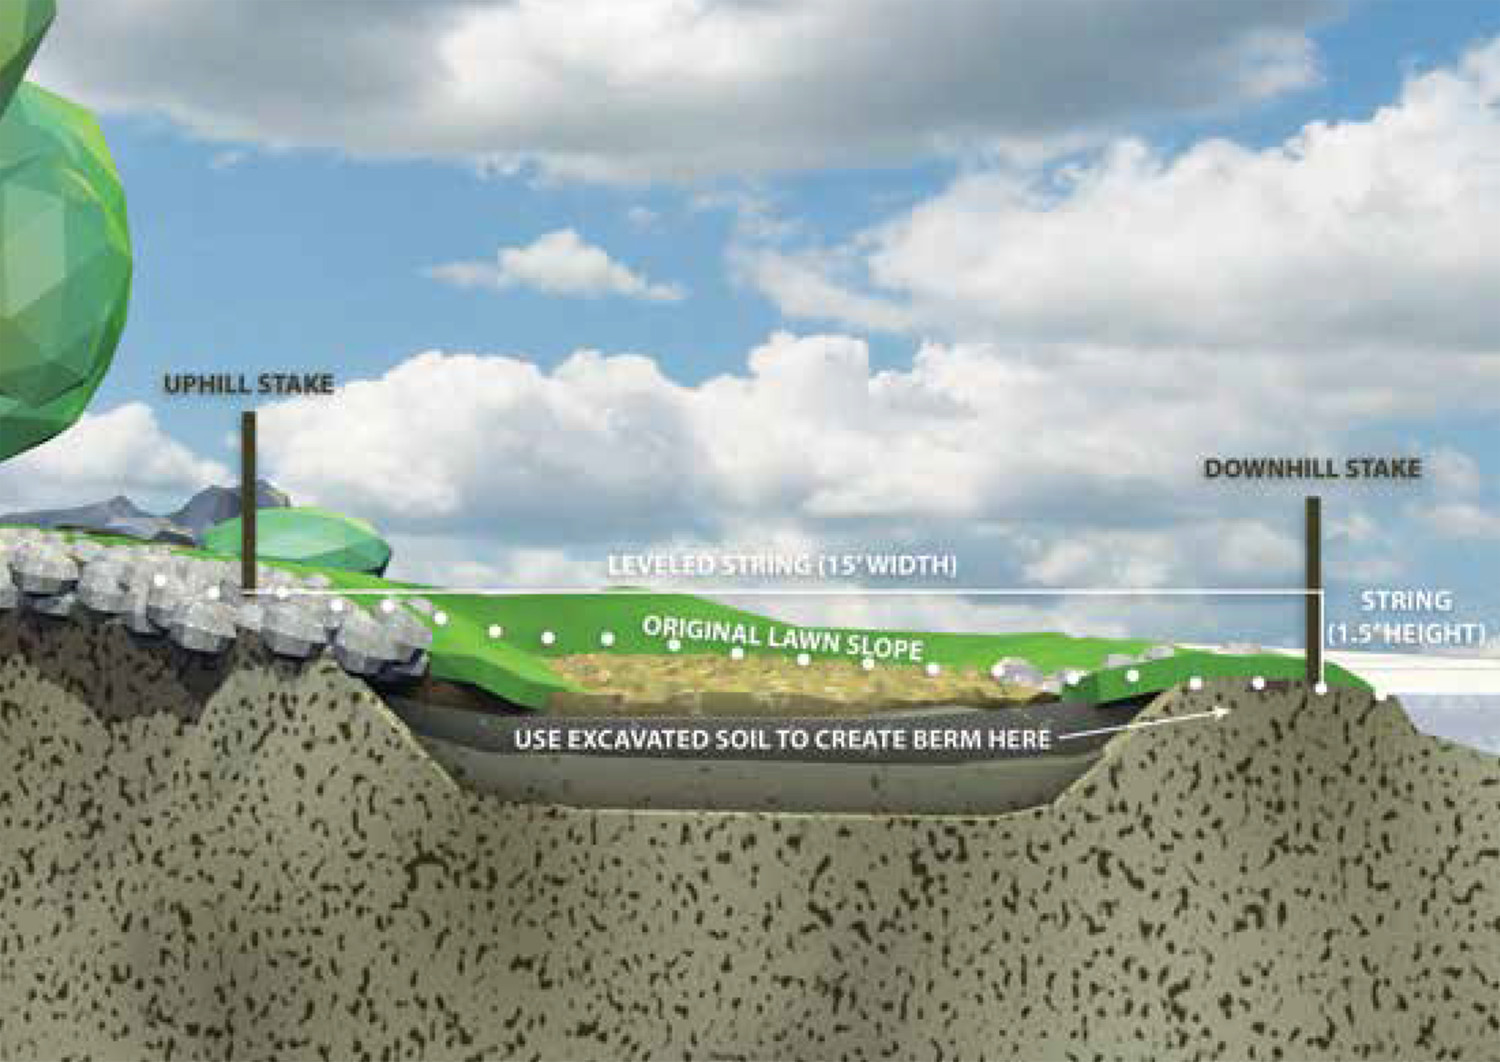
Slope
Most yards in Saskatoon do not have steep slopes and are well-suited for rain gardens. However, if you are concerned that the slope of your yard is too steep for a rain garden (more than 10%), please follow the steps below to determine the slope of your yard.
• Place one stake at the uphill end of your rain garden and place another stake at the downhill end.
• Tie one end of a string to the uphill stake at ground level and the other end of the string to the downhill stake, ensuring the string remains level.
• The slope can then be calculated by dividing the height by the width and multiplying the result by 100. For example: (1.5 feet height ÷ 15 feet width) x 100 = 10% slope.
Plant Selection
The plants you select will need to tolerate alternating flood and drought conditions. The inner part of the garden will experience more wet conditions than the outer edge. Other considerations include: plant height, sun and shade requirements, water requirements, and tolerance to common substances found in storm water runoff, such as sidewalk salt. With these factors in mind, choose a combination of non-invasive flowers, shrubs, grasses, ferns, perennials, and bulbs. Moisture loving native plants can be well-suited to rain gardens since they are adapted to our local growing conditions. Purchase from a native plant supplier to ensure you receive quality plants that are native to the prairies.
For a list of native plant and seed suppliers in western Canada, visit npss.sk.ca . Plant suggestions for our climate (zone 3b ) include prairie grasses, ferns, dogwood, sedges, rushes, meadow rue, marsh marigold, Joe-Pye weed, irises, lilies, hosta, water avens, shooting star, snowdrop anemone, purple cone flower, blanket flower, wild bergamot, black eyed susan, and smooth aster.
Before you get started
Tools you will need:
• Gardening gloves
• Close-toed shoes
• Measuring tape
• String and 2 stakes (if you are measuring the slope of your yard)
• Hand tools (shovel, spade, garden fork, rake)
• Level
• Trowel
• Ground paint or string
Materials you will need:
• Plants
• Mulch
• Amended soil with good drainage and absorption properties
• Washed round rock or pea gravel
Building a rain garden in 10 easy steps
1. Using ground paint or string, mark the desired shape of your rain garden. Choose a shape and size that complements your yard.
2. Mark the inlet channel. The inlet channel is a shallow trench that directs water from your water source (e.g. downspout, rain barrel, lawn, and/or driveway) to your rain garden. It must be sloped towards your inlet. Mark the inlet. The inlet is the point where water from the inlet channel enters your rain garden. It must be higher than the outlet. Mark the outlet. The outlet is the point where excess water exits your rain garden (e.g. during heavy rainfalls) and overflows into your local storm water system. It must be the lowest part of your rain garden.
As a general rule of thumb:
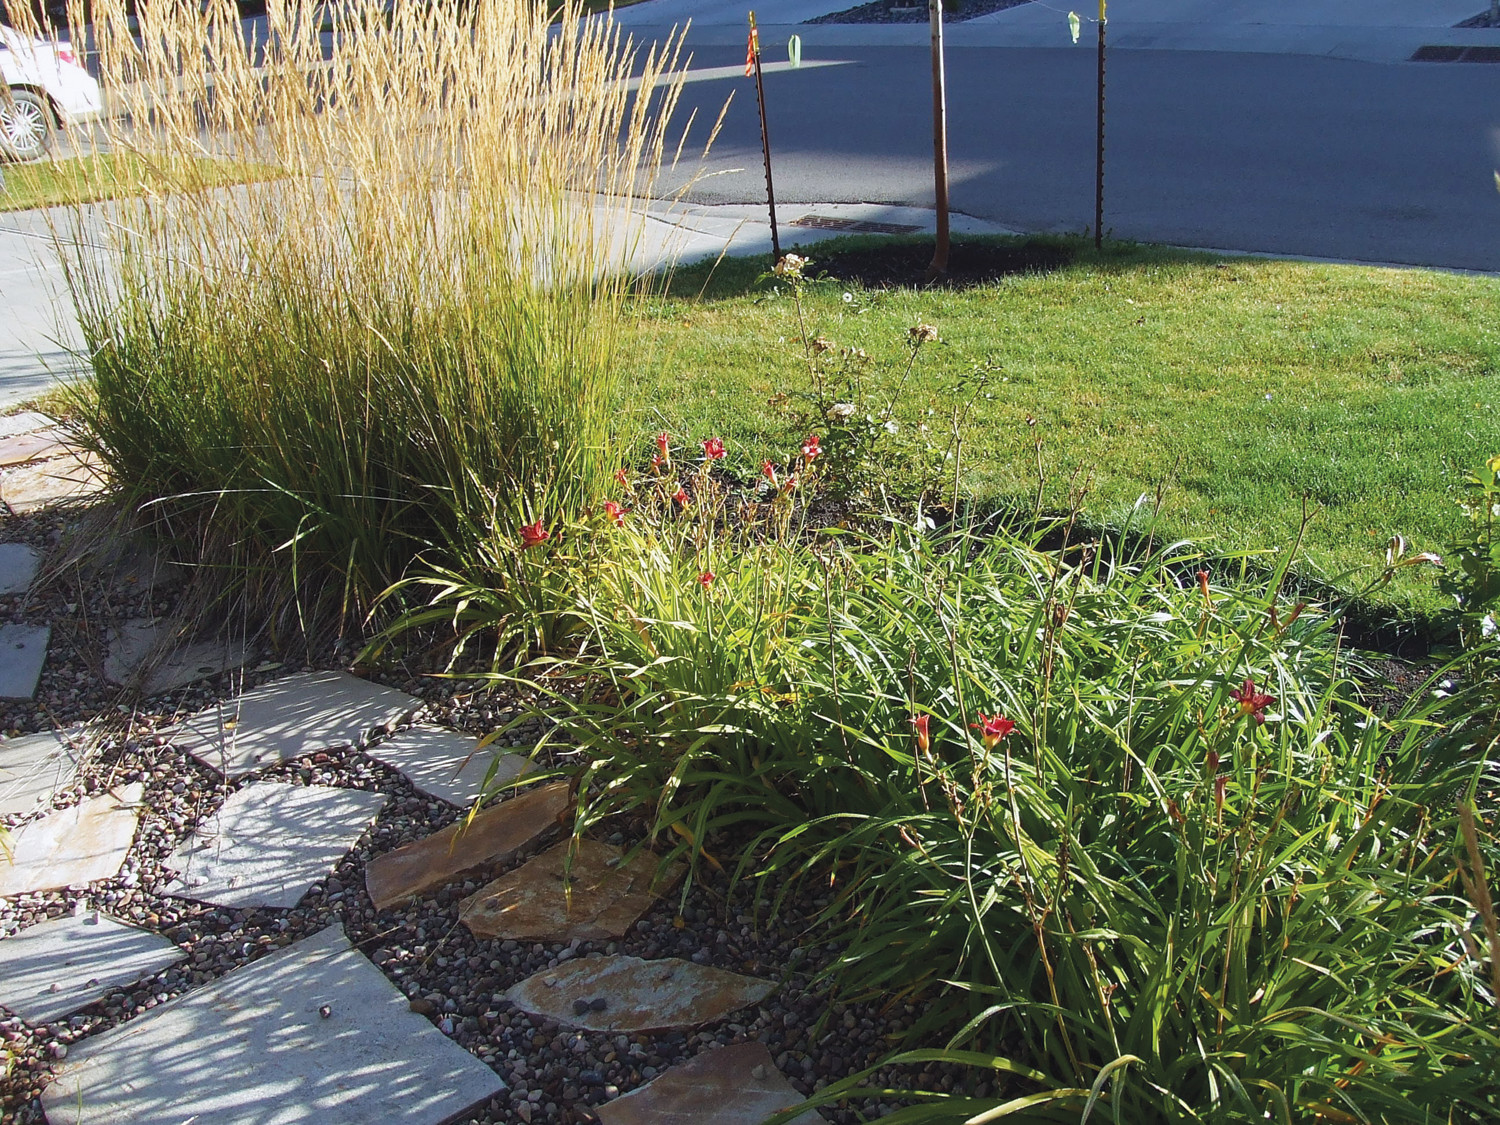
• If you are constructing a rain garden in your front yard, direct the outlet towards the front street;
• If you are constructing a rain garden in your back yard, direct the outlet toward the back lane or rear property line; and
• Always ensure the outlet is not directed towards any neighbouring yards.
3. Using the ground markings as a guide, dig your rain garden down to a depth of 20 to 26 inches. See Figure 3 for details. Keep the base of your rain garden as level as possible so water can infiltrate easily and equally. Use a level if necessary. Then dig your inlet channel down to a depth of 2 to 4 inches. Keep the inlet channel sloped towards your rain garden so water can easily drain away from your building foundation(s). And remember, only dig when the soil is dry. If you dig when wet, you will compact your soil to the point where water can no longer infiltrate.
STAY SAFE! For your own and others’ safety, contact Sask 1st Call before starting any project requiring digging, excavation or ground disturbance.
4. Shape the sides of your rain garden so they are sloped at a 25% to 33% angle (4:1 or 3:1 ratio of horizontal distance to vertical distance).
5. Build a berm around the edge of your rain garden. A berm is a shallow hill of soil that helps contain water in your rain garden. Use the berm to direct water towards your outlet. In place of a berm, you may also use rocks or bricks to border your rain garden.
6. Dig spaces out of your berm where you marked the locations of your inlet and outlet. Lay down washed round rock or pea gravel at the inlet and outlet to prevent soil erosion and to slow down water ow. Afterwards, ll the inlet channel with washed round rock or pea gravel as well.
7. Loosen the soil on the bottom of your rain garden to a depth of 12 inches to reduce soil compaction and encourage infiltration. It is recommended that you use hand tools, such as spades and garden forks, because rototillers can disrupt soil structure and biology.
8. Carefully add 10 to12 inches of amended soil to your rain garden. Some of this amended soil should be mixed into the soil you loosened during the previous step to ensure that water naturally drains into your existing soil. Once your amended soil is added, gently compact the layer by walking on it.
What Is Amended Soil?
9. Using a hand trowel, plant your garden. Make sure to follow the planting and spacing recommendations for each plant. To avoid soil compaction, work from one side of the garden to the other. If you think that you have packed down the soil too much, use a rake or garden fork to loosen it.
10. Use a rake to gently spread 4 inches of mulch evenly across the garden, without burying the crowns of new plants. To learn more, read our Mulch & More: How-To Guide.
Maintaining your rain garden
To maintain a successful rain garden:
• Water regularly for the first two years, reducing water frequency in the second year. After plants are established, supplemental watering should only be necessary during dry spells.
• Weed and prune as necessary. The rain garden soil mix will be loose, so weeds should be relatively easy to remove.
• Check the inlet, outlet, and under the mulch layer for debris (such as leaves, garbage, and fine sediment) that may be preventing water flow and infiltration. Remove as necessary.
• Replace mulch if erosion occurs. Add more mulch every few years as it slowly decomposes.
• Replace plants as necessary.
• Add compost annually. Learn more in our Compost: How-To Guide.
• Fertilizing is not required. The rain garden soil mix will provide adequate nutrients for your plants.
• Do not use pesticides. Learn more in our Pesticide Free Gardening: How-To Guide.
• You may cut back your plants in fall or leave them in place over winter to provide food and shelter for birds and wildlife. Once new growth appears in the spring, simply remove dead plant material from the previous gardening season.
• Monitor performance by checking for flooding or ponding.
• Through absorption and infiltration, rain gardens can prevent water from flowing onto sidewalks, driveways and pathways. However, during freeze/thaw cycles (particularly in the spring and fall), keep an eye on any icy patches that may form close to your outlet.
Other considerations
Do rain gardens harbour mosquitoes?
A properly constructed rain garden will drain water, not hold it. Water will only be present for 1 to 3 days and mosquitoes need standing water for 7 to 12 days.
What is the cost for a rain garden?
The cost will depend on how much work you decide to do yourself. If you do all the work yourself, it will be much less than if you hire a landscaper.
Where is a DIY rain garden appropriate?
Residential projects that don’t pose any complex challenges or site constraints (e.g. steep slopes) are appropriate to do yourself.