

- Brussels sprouts are the only brassica that should never be planted from seed on the Canadian prairies. Why? At 140 days to maturity, we simply don't have a long enough growing season. You'll have better results starting them as transplants.
- Brussels sprouts are one of the few vegetables that should always be capitalized because they're named after the city of Brussels. Alternatively, saskatoon berries are not capitalized since the city of Saskatoon was named after the berry.
- Around the third week in August, snap off the top 2 cm of the plant to encourage it to produce larger sprouts.
- Sprouts get sweeter with frost. Leave them in the garden for a few light touches of frost before harvesting.
- Many people are surprised by what Brussels sprouts look like before picking. The sprouts actually grow along the thick woody stalk of a fairly tall plant.
- Brassica oleraceae is a wild mustard plant. This was a very diverse plant and growers nurtured groups of plants that focused on whichever part of the plant they wanted to eat. Over time, some people selected wild mustard plants with larger, underdeveloped flower stalks. Now we call those plants broccoli! Other growers focused on other parts of the plant. For example, growers favoring plants with larger and larger top buds eventually developed the plant we call cabbage and those favoring small side buds developed the wild mustard into Brussels sprouts. Since all brassicas come from the same basic wild mustard, they have common gardening needs. Other brassicas include kale, kohlrabi, broccoli, and cauliflower.
- Brussels sprouts is considered a “new vegetable” since it was popularized within the past 400-500 years.
- In cabbage, the stem is short and one large cabbage head forms at the top of the plant. A simple way to visualize Brussels sprouts is to think of it as a tall-stemmed cabbage with multiple smaller heads called sprouts that form along the side of the stem instead of at the top.
- The French coined the term Brussels sprouts in the 18th century. Is named after the city Brussels in Belgium but it is unknown if it was selected there or just a widely popular vegetable grown near Brussels. Because it was named after a city, the B in Brussels should always be capitalized.
Brussels sprouts are classified as brassica vegetables (cole crops) and belong to the mustard family of plants. These Brassicaceae plants were formerly classified as cruciferous plants. ‘Cruciferous’ because the petals of the flowers of these crops form a cross.
Brassica vegetables include cabbage, broccoli, cauliflower, kale, kohlrabi, Brussels sprouts, radish, turnip, rutabaga, Chinese cabbage, mustard greens and mustard cabbage (bok choi or pak choi). Since all of these plants share a recent common ancestor, they all have very similar growing recommendations and problems.
While they are quite similar, there are some key differences to ensure best success so we've broken these into separate articles for easier instruction.
Brussels sprouts are high in vitamins C, K, B6, folate, thiamin, manganese and fibre. Check here for detailed information from the USDA National Nutrient Database for Standard Reference. Harvard School of Public Health recommends eating them no more than once a week.
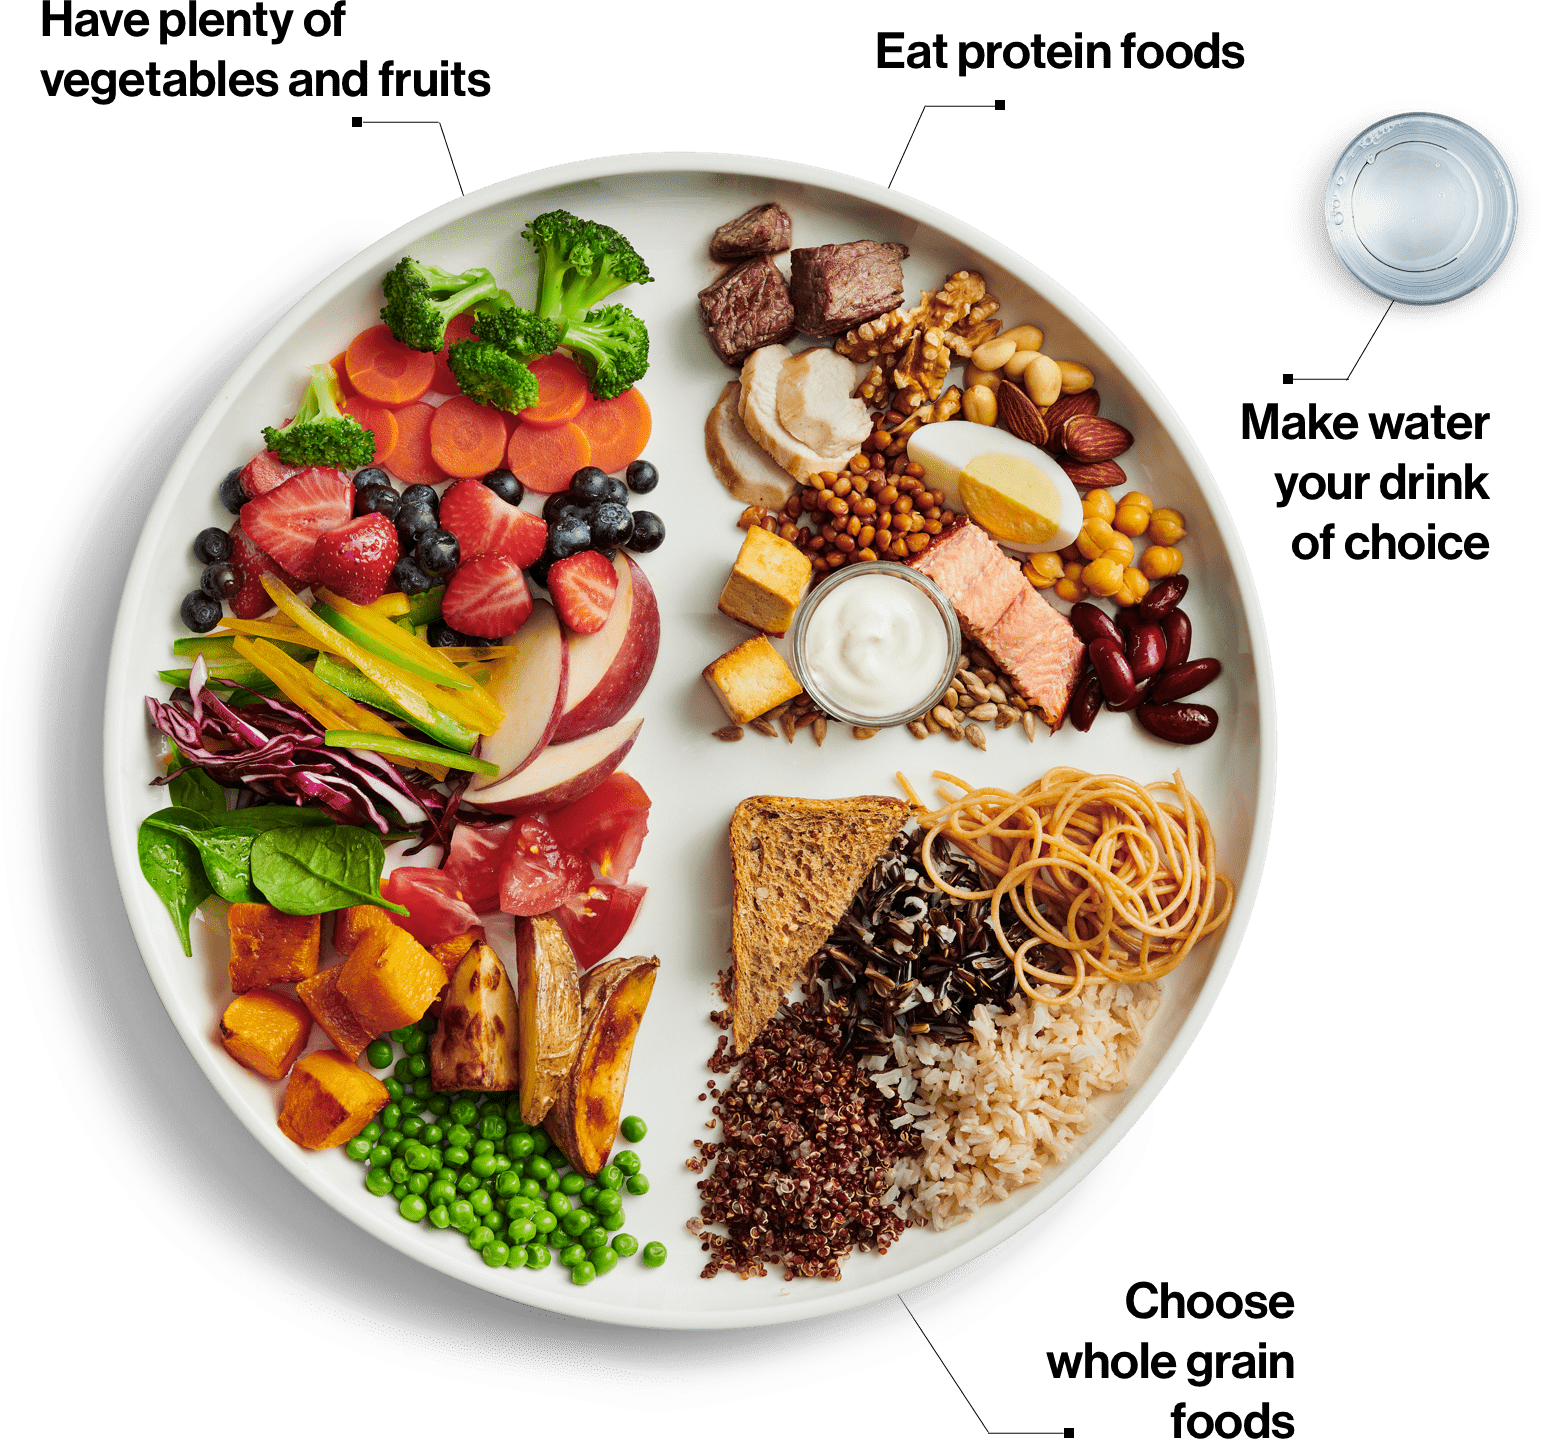
The Canadian Food Guide recommends that roughly half of the food on your plate should be fruits and vegetables.
Growing outdoors
Click on the tabs above for more information!
Brassicas grow best in well-draining, moist soil. You can improve your soil's ability to hold moisture by adding organic matter such as compost or aged, composted manure. Do not use fresh manure as a soil additive. If you think your soil needs remediation, see our Soils and soilless mixes page for detailed advice.
As a leafy vegetable not grown for fruit or flower, they do not require full sun to produce well and can tolerate light shade. However, they will not be successful in very shady areas.
Brussels sprouts are best grown outdoors in the ground, be it in raised beds or unraised/ground level gardens if the soil is suitable. They are not typically suitable for most container, hydroponic, straw bale, or other alternative growing methods.
Our short prairie growing season does not allow enough time to grow Brussels sprouts to maturity so it is necessary to plant transplants outdoors, not seeds. Transplants can be grown in your own home or purchased from a local greenhouse.
Starting your own Brussels sprouts plants from seed
- Start transplants about 5 -6 weeks prior to transplanting out. You can transplant Brussels sprout seedlings as soon as daytime temperatures reach 15°C and night temperatures are not below -2°C for several nights in a row. In Saskatoon, your plant out date is around May 13 so you can start your transplants around the first week of April.
- Sow seeds 0.5cm deep in a commercial soilless media containing peat moss or coir, perlite and vermiculite. Soilless media provides a disease-free environment as well as excellent drainage to minimize root disease problems.
- Use flats, pots or containers with bottom drainage holes. At a soil or media temperature of 24°C, brassica seeds will germinate in 5 or 6 days.
- Good lighting is crucial for the growth of healthy seedlings. Brassica seedling transplants require a minimum of 14 hours of light each day.
- Leave a fan blowing on your young seedlings as they grow to will help to grow heartier plants and to reduce some seedling diseases.
- For more details, check out our article on growing your own transplants.
The ideal brassica transplant:
- is approximately 10-15 cm tall.
- is dark green in color, though the lowest leaves may be a lighter color.
- has a good root system but is not root-bound (tight, hard ball of roots that do not break apart when gently massaged).
- has a stem that is strong and sturdy. The internodes (spaces between leaves along the stem) will be small. Transplants that are too tall will tend to break and dry out more easily once planted out into the garden. Research has shown that stem diameter can be increased and height controlled by providing seedlings with constant air movement from an oscillating fan – or by lightly brushing seedling tops with a tea towel or stick at least 20 times daily.
Fertilizing recently planted seeds or young seedlings is not recommended. The first leaves that grow are not true leaves. They are "seed leaves" called cotyledons and are shaped like a capital B. All leaves that grow after these are true leaves. Once your seedling is mature enough to grow true leaves, you can begin to fertilize two times per week using 20-20-20 water-soluble fertilizer. Mix according to label directions.
Harden off transplants prior to planting out by moving them outdoors into a sheltered, frost-free location at least 3 days prior to transplanting.
Don't forget to label what you planted. It's also helpful to draw a map to help you track planting locations and success each year. This information is critical if you're rotating your crops to help prevent insect and disease issues.
Brassicas tend to attract cabbage moths and flea beetles. If you're planning to stay pesticide-free, it's important to use row covers to prevent insect damage. This is especially critical if you're near canola fields. Row covers should be installed very soon after planting, long before the insects arrive.
If you have had cutworm problems in your garden, place a collar around your transplants right after planting. Make collars out of toilet paper rolls, or any tin can or plastic container such as a yogurt container with both ends removed. Insert the collar at least 5 cm in the ground to prevent cutworms from feeding on the stems of your transplants.
Timing
- Brussels sprouts must be planted as transplants and not sown as seeds. See our transplants tab for tips on growing or purchasing your own transplants.
- You can transplant Brussels sprout seedlings as soon as daytime temperatures reach 15°C and night temperatures are not below -2°C for several nights in a row. In Saskatoon, your plant out date is usually any time after May 13.
- Transplants must be hardened off before transplanting outdoors. While mature brassicas are frost tolerant, young transplants are less so.
Planting instructions
- When planting, cover the entire transplant “plug” or seed ball with soil to prevent the plant from drying out. Exposed peat or coir within the plug will act as a wick, drawing water away from the transplant and drying out the root ball.
- Gently massage the roots within the plug so that the roots will grow into the surrounding soil and not remain restricted within the ball.
- Brussels sprouts transplants should be spaced 50 cm apart within the row, allowing at least 1 meter between rows.
- Here are cultivar recommendations from the North Dakota State University Cultivar Trials, as they share a similar prairie climate and soils. You may download their list here: North Dakota State University Vegetable Cultivar Recommendations for 2021
-
- no information available for Brussels sprouts
-
- The following cultivars are recommendations from the University of Saskatchewan vegetable program field trials which were conducted from 1989 through 2016. Although this information is no longer current, some may find it useful.
- 'Brilliant' – Good yields. Uniform sprout size
- 'Diablo' – Good yields. Very attractive dense sprouts. Variable sprout removal
- 'Divino' – Good yields. Tall straight stalks. Dense uniform sprouts are easy to remove
- 'Nelson' – Good yields, firm dense sprouts
- Break off the top 1 cm of the plant around the 3rd week of August. This will cause the plant to put its energy into the side buds (the Brussels sprouts) instead of continuing to grow tall.
- Actively growing Brussels sprouts prefer 2.5cm moisture/week in well-drained soils.
- Brussels sprouts can be grown successfully most years without additional water though you can expect smaller plants as a result. Water will affect yields, so if you're using more intensive growing methods you will need to water.
- Pick weeds as they appear, especially those in the Brassicaceae family which attract the same insects affecting Brussels sprouts: common pepper-grass, shepherd's purse, stinkweed, Argentine canola, ball mustard, dog mustard, flixweed, Polish canola, wild mustard and wild radish.
- To reduce weeding, apply a thick layer of mulch around plants.
Brussels sprouts are not suited to fall seeding.
Coming soon!
Since Brussels sprouts and Broccoli are extremely closely related (i.e., the same species), their germination requirements are the same.
Growing in containers and indoors
Brussels sprouts are not good candidates for container growing, whether indoors or out. Smaller or leafy brassicas such as kale, bok choi, radishes or pak choi work very well instead.
Saving seeds
Seeds are expected to be shelf-stable for one year from date of sale if purchased from a reputable retailer. If you wish to save your seeds beyond that, you should store them in the fridge in a jar. Seeds lose viability quickly if they dry out too much or get too warm.
The life expectancy of Brussels sprout seed stored under favourable conditions is about four years.
Seeds stored under less favourable conditions will show poor germination after just a single year of storage. Beyond this, you can expect your germination rates to go down (ie. not all of your seeds will grow, but some might). To test your seeds, you can do a simple germination test. Follow the link for instructions. If you are still getting some seeds germinating, seed more thickly and thin any extra.
Brussels sprouts are biennials and set seed in their second year of growth when grown in a warmer climate. Since Brussels sprouts plants do not survive a prairie winter, seed saving is not recommended.
As our climate continues to change, this may become a viable option for prairie gardeners in the future.
Harvest
Click on the tabs above for more information!
By early October, the sprouts should be a good size for harvest. For best
You may start picking the lower sprouts when they are between 1 to 1.5 inches (2.5-4 cm) in size. Sprouts should be bright green and firm. Use a sharp knife to cut the sprouts from the main stalk.
If the weather stays cool, you could expect 100 of these "tiny cabbages" per plant. Don't harvest too early - Brussels sprouts hit by a light frost tend to be less bitter and sweeter tasting.
Brussels sprouts don't have a particularly high respiration rate. While it is important to keep them cool during harvest, as it is with most vegetables, it isn't critical.
Storage
Brussels sprouts can be stored in the refrigerator for a few weeks to a month (see below for details). If you're hoping to store them longer than a month, use other preservation methods such as freezing, fermenting, canning or drying.
The ideal storage conditions for Brussels sprouts is near 0˚C with high humidity. Your fridge is likely a few degrees warmer than this, but it will work as long as you manage the humidity.
- Brussels sprouts will stay fresher for a longer time if kept on the stalk. If you're keeping them on the stalk, keep the base of the stalk in water, just like you would for a vase of flowers. Place the entire stalk and water in the fridge and break off fresh sprouts as needed.
- If you've removed them from the stalk, store them in a plastic bag in your fridge. As they age, your Brussels sprouts will give off extra moisture. This moisture will cause the sprouts to rot. To maintain adequate but not excessive humidity either poke a few holes in your bag (ok), or use a plastic bag meant for vegetables (better), or keep a few sheets of paper towel in the bag with them and switch the paper towels for new ones once they become too moist (best).
- For detailed advice on other potential spaces or methods, see our cold storage page.
Cooking and preserving
Loading...
Brussesl Sprouts and Cabbage are the same species of Brassica and so many recipes and preservation strategies are similar.
Troubleshooting
Click on the tabs above for more information!
Brussels sprouts are relatively low maintenance providing their water, light and soil needs are managed.
Ensure that you maintain healthy soil with adequate organic matter.
Like all brassicas, Brussels sprouts are subject to a number of insect problems, especially if you are located in an area where canola (a close relative) is being grown. Cover your plants with row covers and secure the edges is an effective way to prevent insect problems.
See the Common problems tab on this page for advice on other specific Brussels sprouts issues.
Loading...