
Note: Each section on this page contains multiple topics. You will need to click on the tabs in each section for more information.
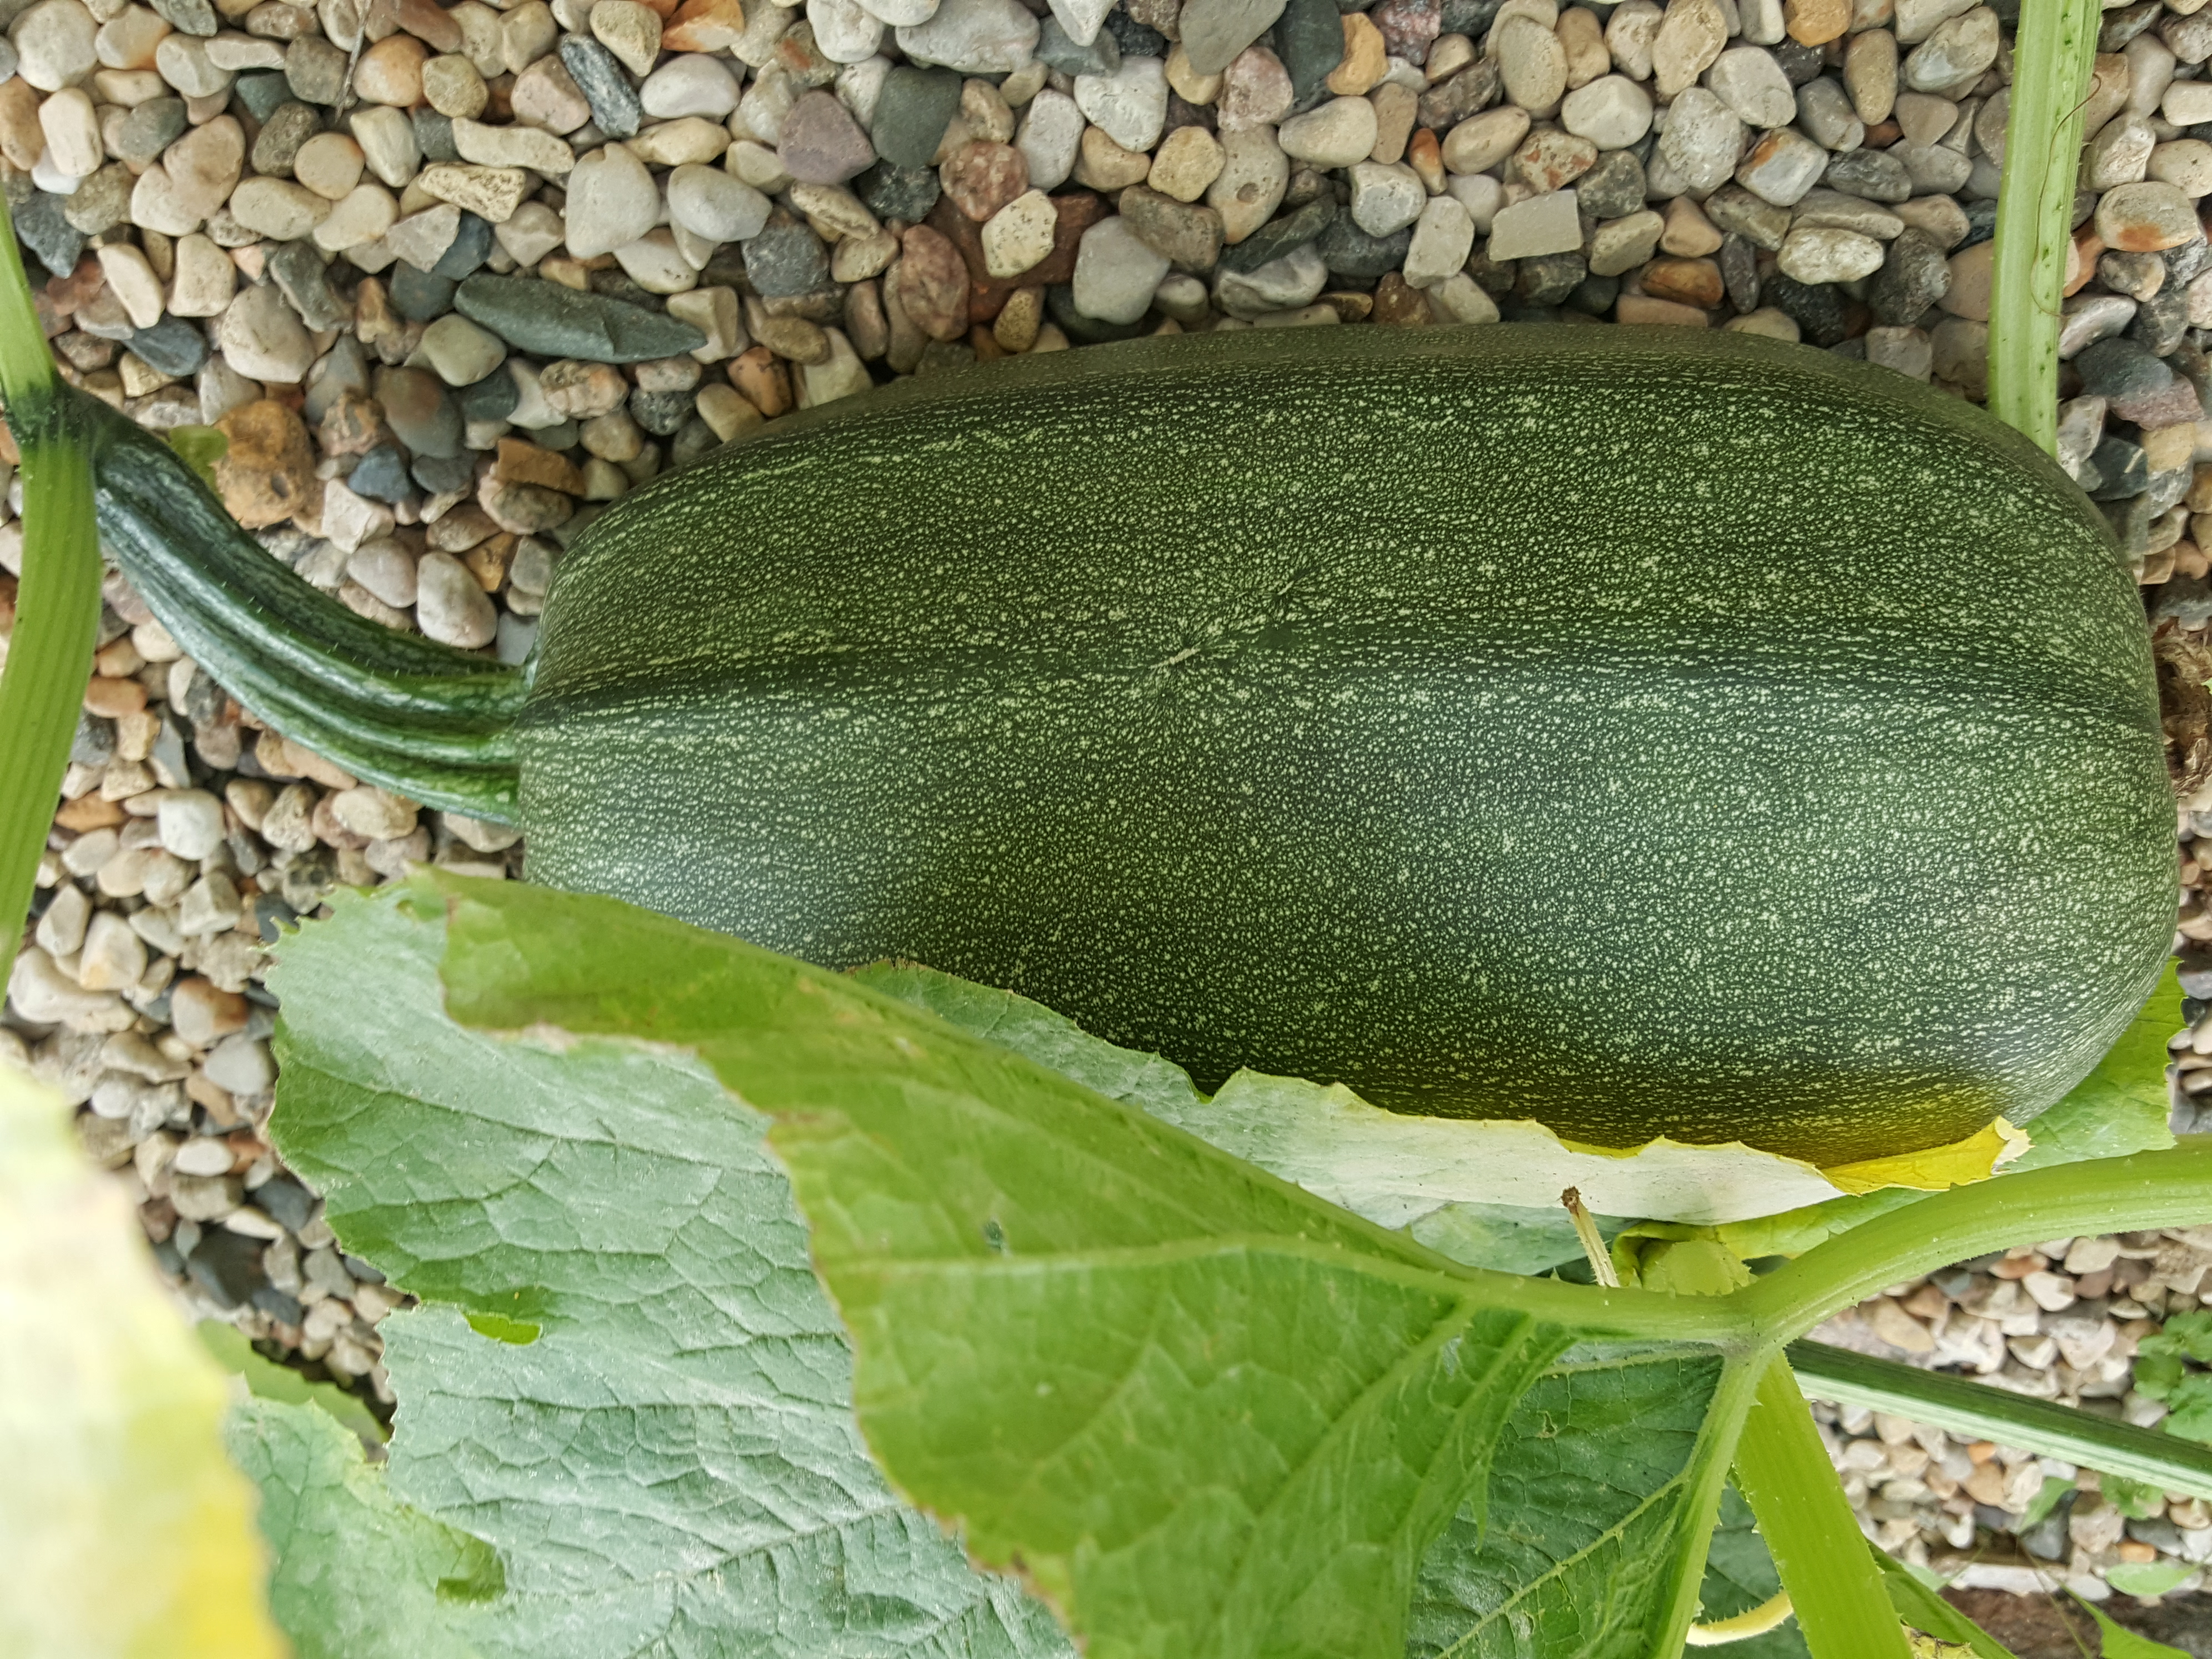
- Winter squashes include acorn, spaghetti, butternut, hubbard, kabocha, buttercup, delicata and others. They are called winter squashes because they develop a thick skin which helps them to keep well into winter, unlike summer squashes like zucchini which have tender skin and don't keep as long.
- Winter squashes are a fairly easy vegetable to grow on the prairies. They are a warm season season plant that need full sun and warm soil of at least 15°C for seed germination and optimal growth.
- Since winter squashes need up to 110 days to maturity, they are best grown as transplants on the prairies and in the far north.
- Squashes are vines and need lots of space! For the best fruit and growth, keep them well watered and fertilized.
- Winter squashes benefit from growing in plastic mulches, supported plastic tunnels or crop covers. Crop covers and tunnels must be removed as soon as flowers appear so that bees and other pollinators can pollinate flowers.
Winter squashes are classified as cucurbit (Cucurbitaceae) vegetables. The cucurbit family includes cucumbers, summer squash (zucchini), winter squash (hubbard, acorn, spaghetti, kabocha, butternut, buttercup delicata), pumpkins, melons, and gourds.
Since all of these plants share a common ancestor, they all have very similar growing needs and are prone to similar problems.
While they are quite similar, there are some key differences, so to ensure best success so we've broken these into separate articles for easier instruction.
Winter squash nutrient values vary by cultivar but are generally high in vitamin C, E, B6 and riboflavin. Check here for detailed information from the USDA National Nutrient Database for Standard Reference.
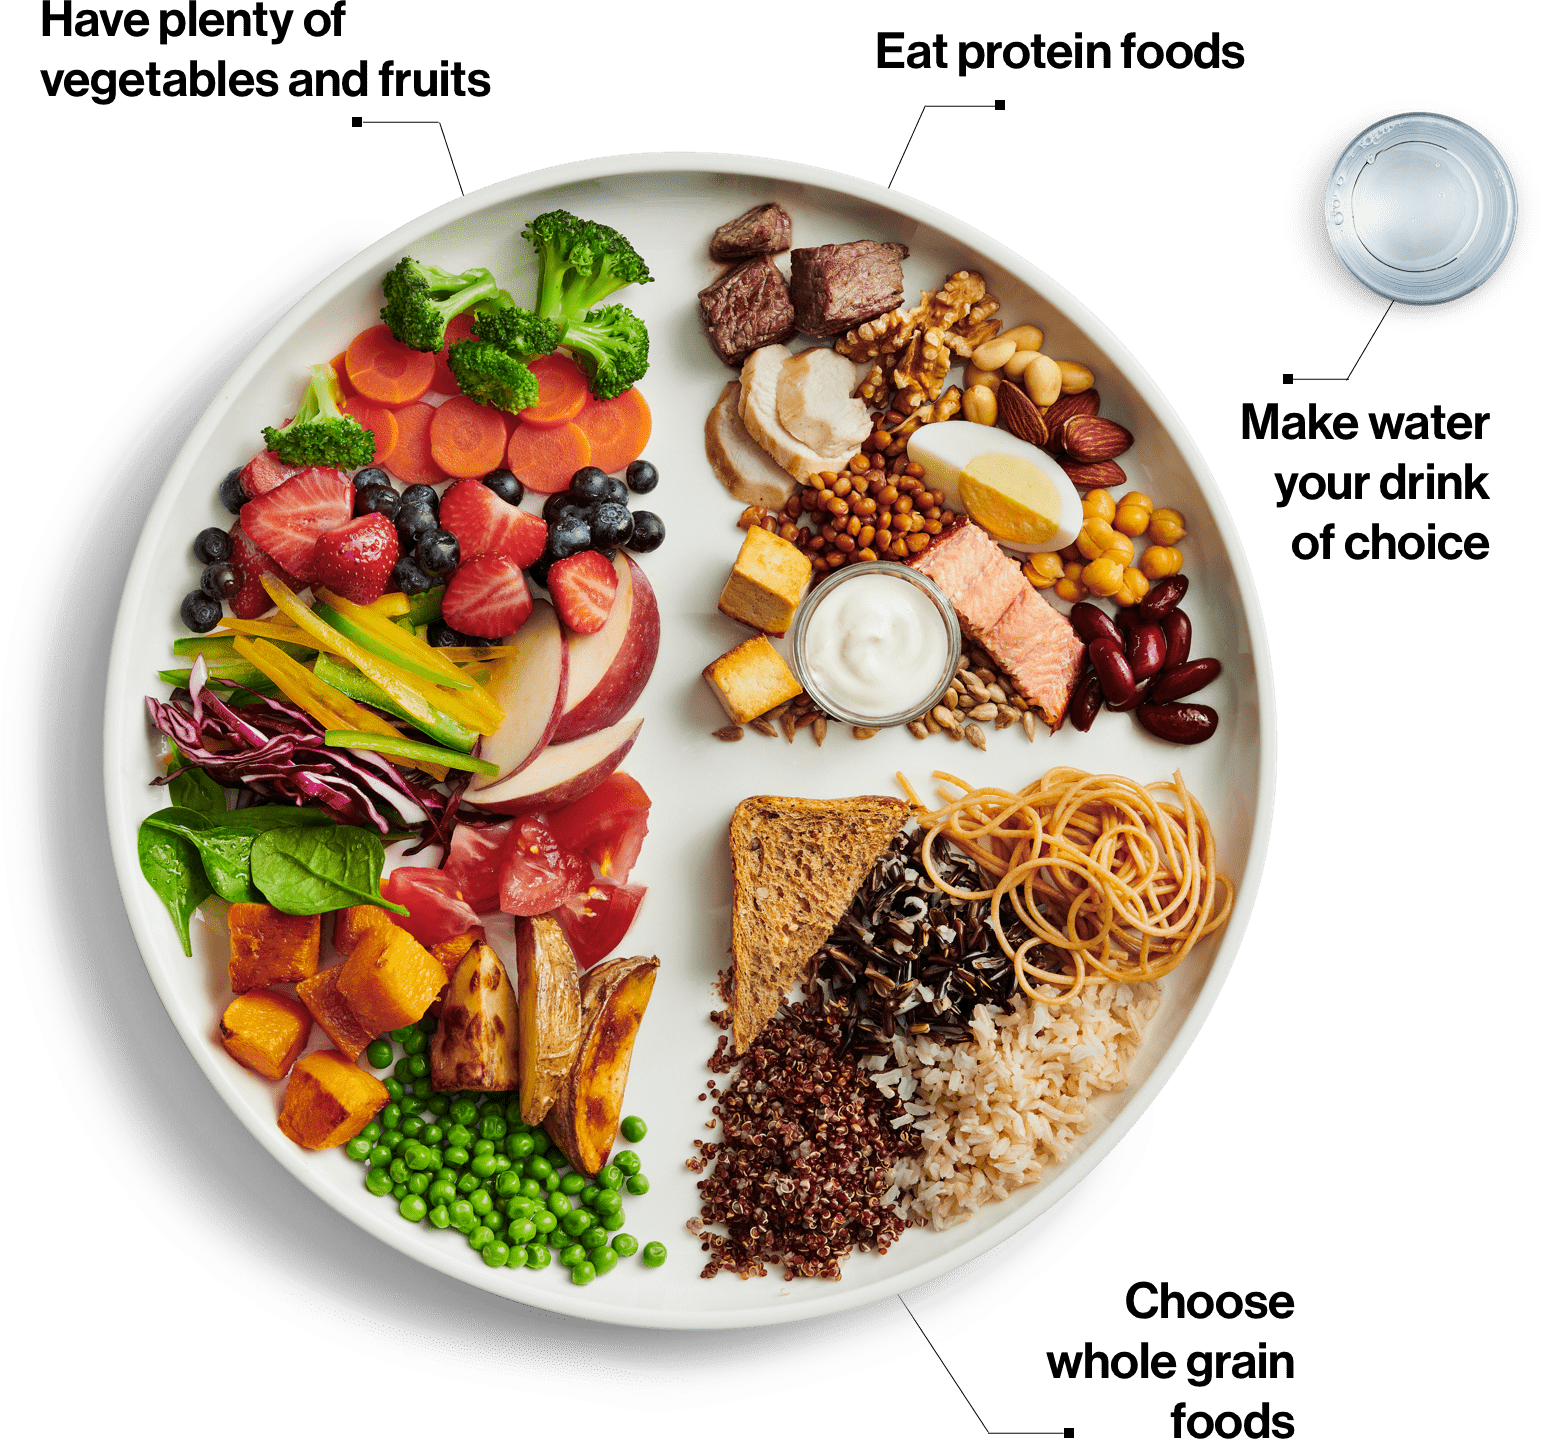
The Canadian Food Guide recommends that roughly half of the food on your plate should be fruits and vegetables.
Growing outdoors
Click on the tabs above for more information!
Winter squash grows best in rich, well-draining, moist soil. You can improve your soil's ability to hold moisture by adding organic matter such as compost or aged, composted manure. Do not use fresh manure as a soil additive. If you think your soil needs remediation, see our Soils and soilless mixes page for detailed advice.
As a vegetable grown for its fruit, they need full sun to produce well and do not tolerate shade.
Note that squash vines need a lot of space! Consult the information on the seed packet for correct spacing.
Winter squash are best grown outdoors in the ground, be it in raised beds or un-raised/ground level gardens if the soil is suitable. While they can also grow in containers outdoors, this is less practical due to their large size, unless a 'bush type' of variety is used. They are not a practical plant for indoor growing. They are not typically suitable for hyrdoponic, or other alternative growing methods, but would be suitable for straw bale gardening.
Winter squashes are a warm season plant that need between 85 and 115 days to maturity, depending on the type. If direct seeding winter squash, grow cultivars that mature in 80 days or less. If winter squash is transplanted, use cultivars that mature in 100 days or less.
They can be seeded or transplanted once the soil is warm (at least 18°C).
If you live in the far north, grow winter squashes as seedlings. Seedlings can sometimes be purchased from a local greenhouse.
Starting your own winter squashes plants from seed
- Winter squashes do not like root disturbance from transplanting, so it's important not to start seedlings too early. Seedlings should only be 10-14 days old before planting out (cotyledons have emerged along with only one or two true leaves). Larger transplants will experience transplant shock when they are planted outdoors. Plants will not grow for several weeks (or at all) depending on the level of transplant shock they experience. See our video below.
- Start seedlings about 2 -3 weeks prior to transplanting out. You can transplant seedlings as soon as daytime and nighttime temperatures are warm at least 18°C, about 2 weeks after your last average frost free date. For example, in Wollaston Lake (northern Saskatchewan) your plant out date is June 5, so start your seedlings around the first of June for planting out around June 20.
- Jiffy-7's are good for sowing seeds because there is less root disturbance when planting. Soak the Jiffy-7's for 20 minutes in warm water to fully hydrate and expand them. Once they are planted, cover with plastic or a dome and do not water. Remove the plastic once seeds have germinated.
- Another way to reduce root disturbance is to use home-made newspaper pots or peat pots. Fill them with a soil-less mix that contains peat or coir and vermiculite and/or perlite. (Both of these types of pots can be planted directly in the soil, but be sure to bury the rim of these pots. Otherwise the rim acts as a wick and will dry out your seedling.)
- Sow 2 seeds 1 cm deep per JIffy-7 or container and then thin to the strongest plant after they have grown their first set of true leaves.
- Winter squashes prefer warm soil. At 24°C, seeds will germinate in 5 or 6 days. Use a heat mat if you have one, or place pots in a warm spot like the top of the fridge for germination.
- Take care not to over water your seedlings. Soil should be moist like a damp sponge, but not soggy.
- Place seedlings under lights after germination, which is crucial for the growth of healthy seedlings. seedlings require a minimum of 14 hours of light each day.
- Leave a fan blowing on your young seedlings as they grow to help to grow heartier plants and to reduce some seedling diseases. Research has shown that stem diameter can be increased by providing seedlings with constant air movement from an oscillating fan – or by lightly brushing seedling tops with a tea towel or stick at least 20 times daily.
- For more details, check out our article on growing your own seedlings.
The ideal winter squash transplant:
- has no more than two sets of true leaves. The first leaves that grow are not true leaves. They are "seed leaves" called cotyledons and are round. All leaves that grow after these are true leaves.
- is dark green in color.
- has a good root system but is not root-bound (tight, hard ball of roots) or has lots of roots growing out of the Jiffy-7.
- has a stem that is strong and sturdy. The internodes (spaces between leaves along the stem) will be small. seedlings that are too tall will tend to break and dry out more easily once planted out into the garden.
- Fertilizing recently planted seeds or young emerging seedlings is not recommended. Start fertilizing a few days after they have been planted out in the garden using 20-20-20 water-soluble fertilizer once or twice a week. Mix according to label directions.
Harden off seedlings prior to planting out by moving them outdoors into a sheltered, frost-free location at least 3 days prior to transplanting.
Don't forget to label what you planted. It's also helpful to draw a map to help you track planting locations and success each year. This information is critical if you're rotating your crops to help prevent insect and disease issues.
Timing
- Winter squashes may be direct seeded in the garden or planted as seedlings. See our transplants tab for tips on growing or purchasing your own transplants.
- You can transplant seedlings as soon as daytime temperatures are above 18°C. For example, in Wollaston Lake (northern Saskatchewan) your plant out date is June 5, so start your seedlings around the first of June for planting out around June 20. Saskatoon's plant out date is around May 13, so start your seedlings around May 7 for planting out at the end of May or beginning of June.
- Transplants must be hardened off before transplanting outdoors. Winter squashes do not tolerate cool soil or air temperatures.
Direct sow instructions
- Sow 3-4 seeds 2 cm (1″) deep and 90cm-120cm (36-48″) apart within the row. Rows should be at least 120-180cm (48-72″) apart. Thin to the strongest seedling.
Planting instructions for seedlings
- When planting, cover the entire transplant “plug” or seed ball with soil to prevent the plant from drying out. If using newspaper pots or peat pots, make sure they are quite moist before planting and remove the rims of the pots. Exposed rims, peat or coir within the plug will act as a wick, drawing water away from the transplant and drying out the root ball.
- Try not to disturb the roots when planting.
- Seedlings should be spaced 25 cm apart within the row, allowing 90 cm between rows.
- Water the transplants in with 10-52-10 soluble fertilizer, mixed according to the directions on the label. This is only done once, to encourage good root development. See the "Care Once Planted" tab for how to fertilize for the rest of the growing season.
Cutworm prevention
If you have had cutworm problems in your garden, place a collar around your seedlings right after planting. Make collars out of toilet paper rolls, or any tin can or plastic container such as a yogurt container with both ends removed. Insert the collar at least 5 cm in the ground to prevent cutworms from feeding on the stems of your seedlings.
There are a wide variety of winter squashes which come in all shapes, sizes and colours. Most of them are vines which need a lot of space to grow, but some have been bred as 'semi-vines', often listed as 'bush' types which are more compact.
Acorn, Delicata and Spaghetti squash are some of the earliest maturing types; Buttercup and Kabocha ripen later in the fall; Butternut and Hubbard squash often have the longest season to maturity.
Here are cultivar recommendations from the North Dakota State University Cultivar Trials, as they share a similar prairie climate and soils. You may download their list here:North Dakota State University Vegetable Cultivar Recommendations for 2021
- Acorn: Autumn Delight, Black Bellota, Carnival, Table Ace, Table King
- Buttercup: Bonbon, Burgess
- Butternut: Butter Baby, Butterscotch, Early Butternut, Waltham
- Delicata: Cornell’s Bush Delicata, Zeppelin
- Hubbard: Blue Magic, Red Kuri
- Kabocha: Sunshine, Sweet Mama
The following cultivars are recommendations from the University of Saskatchewan vegetable program field trials which were conducted from 1989 through 2016. Although this information is no longer current, some may find it useful.
- Acorn: Autumn Prince, Celebration, Cream of the Crop, Early Acorn, Festival, Harlequin, Heart of Gold, Table Ace, Table Star, Table Queen, Taybelle, White Cloud, XPH 1755
- Buttercup: Ambercup, Autumn Cup, Black Forest, Burgess Buttercup, Buttercup, Early Prince, Eastern Rise, Fairy, Gold Nugget, Nutty Baby, Orange Dawn, Phoenix, Sunshine, Super Delight, Sweet Mama, Sweet Meat
- Butternut: Avalon Hybrid, Betternut, Burpee's Butterbush, Butternut, Cassius, Early Butternut, Maxim, Plenty, Polaris, Quantum, Tiana, Ultra Butternut
- Hubbard: Heavenly Hubbard, Mini Orange Hubbard, Blue, Essex Red, Hubba Hubba
- Spaghetti: Pasta Spaghetti, Small Wonder, Spaghetti, Stripetti, Vegetable Spaghetti
- Delicata: Delicata, Sugar Loaf, Sweet Dumpling, Sweet Lightning
- Ornamental: Turk's Turban
- Scallop: Sunburst
Winter squashes should have about 2.5cm of water per week early in the season. By mid-July, provide 2.5cm of water, twice weekly. Dry soil may result in smaller winter squashes.
Apply soluble 20-20-20 fertilizer every week prior to fruit set. Increase fertilizing to twice a week after fruit set.
Pick weeds as they appear.
To conserve soil moisture and reduce weeding, apply a thick layer of mulch around your plants, whether in the garden or in a container. Ensure the mulch is not resting against the stems of the plants.
Install a trellis or other support to grow winter squashes vertically. This saves space and improves air circulation which can prevent or reduce fungal problems such as powdery mildew. Once fruit grows larger and heavier, support it with slings made of old nylon pantyhose or soft cloth.
Winter squashes benefit from growing in plastic mulches, supported plastic tunnels or crop covers. Crop covers and tunnels must be removed as soon as flowers appear so that bees and other pollinators can pollinate flowers.
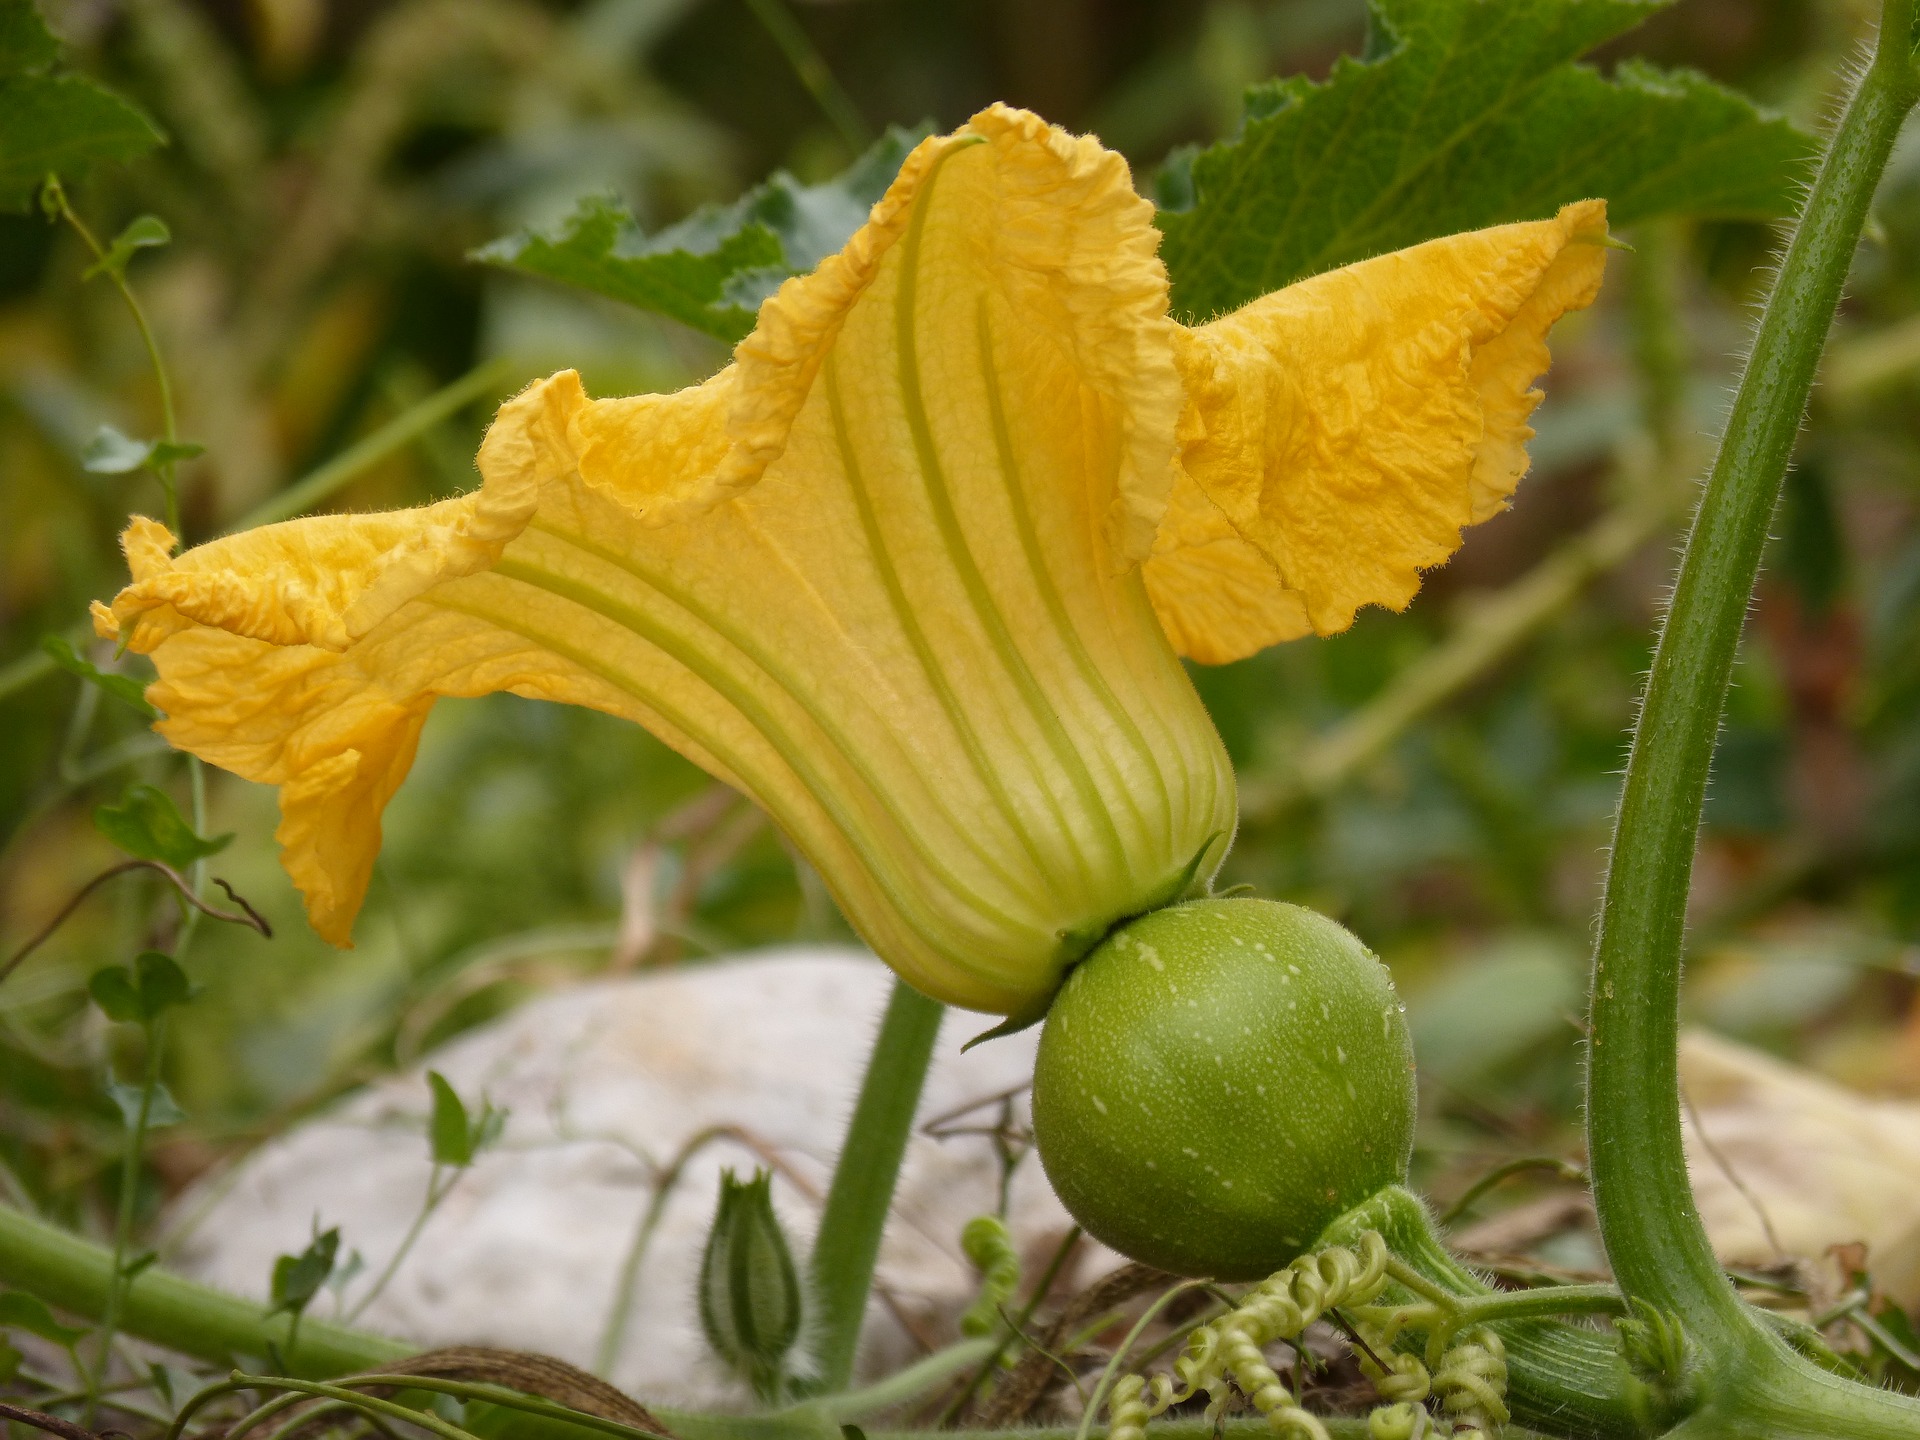
Cucurbits have both male and female flowers on their vines. Male flowers are the first flowers to appear on the plant. It is normal for some of these initial male flowers to fall off – don't be alarmed. Female flowers appear 7-10 days after the male flowers start to appear. The female flowers are identified by what looks like a small fruit where the stem meets the flower. This ‘small fruit’ is missing on the male flowers.
Winter squashes are not suited to fall seeding.
Winter squashes are best grown as transplants in the far north. Direct seed only if the soil is very warm. To pre-warm soil, cover soil with a layer of clear plastic 2 weeks before planting. Secure the edges to keep the plastic from blowing away. Remove the plastic after planting.
Bush-type winter squashes do well in containers. Black or dark coloured containers help keep the soil and root system warm.
Winter squashes benefit from black plastic mulch, row covers and clear low plastic tunnels to keep the environment around the plants warm.
Loading...
See our preservation section for more videos.
Growing in containers
Click on the tabs above for more information!
Winter squashes can be grown in containers outdoors, but are not practical for indoor growing due to their large size, light and water needs.
Select the largest container your can find: one that is at least 19 litres (5 gallons) and has drainage holes in the bottom. A half barrel or large grow bag would work for squashes. Dark containers help to keep the root system warm.
Plant 2 - 3 squash seeds into the container and then thin to the strongest seedling after they get their true leaves.
Place a layer of mulch on top of the soil in the container to keep soil moisture even.
Provide a trellis or stakes to grow vertically for vine types, if desired.
See: Vegetable container gardening
An early-maturing, bush type of winter squash would work best in a container, such as: Cornell’s Bush Delicata or Burpee's Butterbush.
Saving seeds
Click on the tabs above for more information!
Seeds are expected to be shelf-stable for one year from date of sale if purchased from a reputable retailer. If you wish to save your seeds beyond that, you should store them in the fridge in a jar. Seeds lose viability quickly if they dry out too much or get too warm.
The life expectancy of winter squash seeds stored under favourable conditions is about five years.
Seeds stored under less favourable conditions will show poor germination after just a single year of storage. Beyond this, you can expect your germination rates to go down (ie. not all of your seeds will grow, but some might). To test your seeds, you can do a simple germination test. Follow the link for instructions. If you are still getting some seeds germinating, seed more thickly and thin any extra.
Saving winter squash seed is tricky because certain squashes can cross pollinate:
- Delicata, acorn and sphaghetti are related closely enough to zucchini and pumpkin that they can cross pollinate: all are Cucurbita pepo.
- Winter squashes such as hubbard, kocaha, buttercup and turk's turban belong to Cucurbita maxima and can cross pollinate one another.
- Butternut squash is Cucurbita moschata and does not cross-pollinate with the squashes listed above.
Winter squash have separate male and female flowers. The female flower requires pollen in order to produce fruit, but the pollen can come from other compatible species of Cucurbita as described above. Pollen is moved by insects such as bees, bumblebee, hoverflies, ants and others.
Here is an example of cross-pollination: If you grow acorn squash in the garden and it is pollinated by a nearby zucchini, this year's fruit will still look like an acorn squash. But if you harvest the seed from that squash, the seed will contain genes from both the zucchini and the acorn squash. If that seed is grown next year, the resulting fruit will look very different – with a combination of characteristics of both parents. This is called a hybrid.
Winter squashes need to be isolated from related Cucurbit species in order to get seeds that will produce the same type of winter squash next year. Commercial seed producers grow acres of different curcubita plants for seed production. What they do is group like with like in very separate areas – with at least 800 or more feet of separation to prevent cross-pollination. This is not feasible in urban areas but there is a solution.
Controlling pollination
If you plan on saving seeds from a heritage or open pollinated winter squash in your home garden, you'll have to control pollination. Here's how:
- It’s best to do this early in the morning as cucurbit flowers open early and before bees and other pollinators are active.
- Use a small brush or cotton swab to dab the center of a male flower – these are the flowers with a large anther in the middle which contains the pollen. The pollen will stick to the brush as it would on a bee.
- Next, transfer the pollen to the centre of one or more female flowers from the same plant. Female flowers lack an anther and have what looks like a small swelling just beneath the flower. Or, you can simply pick a male flower and gently touch the anther to each of the female flowers you want to pollinate.
- Next, cover the pollinated flower with a muslin or paper bag and secure it so that insects cannot access the flower and accidentally introduce different pollen. The bag can be removed once the fruit starts growing larger.
- Mark the fruit with a piece of yarn so that you remember which one is the controlled cross.
How to save seeds
Harvest seeds from full-grown older squashes because their seeds tend to be fully mature. Carefully cut the squash in half and scoop out the seeds. Wash seeds well to remove as much of the stringy flesh as possible. Spread on a dish towel on a tray and allow to dry completely. Drying can take up to a week.
How to store seeds
Vegetable seeds can keep for several years if you store them properly. Seeds should be stored in a cool, dry, dark place. Moisture, heat and light can cause seeds to sprout or rot.
- Place your seeds in envelopes or make your own envelopes out of foil or waxed paper. Label with name of the seeds and the date (month and year) you harvested them.
- Place your envelopes inside an airtight container. To help keep seeds dry, place about a tablespoon of dry powdered milk in a paper towel or piece of cloth, secured with a twist tie or piece of string. The powdered milk will absorb humidity and keep seeds dry inside the airtight container.
- Put the container in the refrigerator. Do not store seeds in an unheated shed or garage. These places are either too moist and/or too cold for seed storage.
Harvest
Click on the tabs above for more information!
Check your seed package for days to maturity. Acorn, delicata and spaghetti squash are some of the earliest maturing types; buttercup and kabocha ripen later in the fall; butternut and hubbard squash have the longest season to maturity.
Winter squash is a long season crop, so harvest as late in the fall as possible. The plants will freeze at 0°C however, mature fruit can withstand temperatures of -2 to -3°C.
Use a sharp knife or pruners to cut the squash from the stem. Leave at least 3 cm of stem intact to avoid problems with stem end rot.
Winter squash don't have a particularly high respiration rate, so keeping them cool is not as important as it is with other crops such as cucumbers.
Store squash in moderately warm, dry conditions (10°C). Flavour and sweetness vary with each different squash type.
Storage
Store squash in moderately warm, dry conditions (10°C). They will keep for months. Flavours and sweetness vary with each different squash type.
If you're hoping to store them longer than a month, you will need to use other preservation methods such as freezing, fermenting, canning or drying.
For detailed advice on other potential spaces or methods, see our cold storage page
Cooking and preserving
Click on the tabs above for more information!
Winter squash can be canned (pickled), fermented, dehydrated (dried) or frozen.
Coming soon
Loading...

Troubleshooting
Click on the tabs above for more information!
Winter squash are relatively low maintenance. Providing their water, light and soil needs are managed they don't tend to get a lot of issues.
Winter squash need a good supply of water and fertilizer to do well.
Ensuring that you maintain healthy soil with adequate organic matter and use row covers to prevent insect problems will go a long way towards preventing most issues.
See the Common problems tab on this page for advice on other specific cucumber issues.
Common problems include powdery mildew and pollination problems.
Common questions
This looks like accidental cross-pollination.
Squash, pumpkin, gourds and zucchini belong to the same species called Cucurbita. Certain ones, such as spaghetti squash and zucchini are closely related and can cross pollinate.
Here's how it works: If you grow squash in the garden and it is pollinated with zucchini pollen, the fruit on the plant will still look like a squash. But if you harvest the seed from that squash, the seed will contain genes from both the zucchini and the squash. If that seed is grown the next year, the resulting fruit will look very different – with a combination of characteristics of both parents - much like the fruit you have in your garden. This is called a hybrid.
Commercial seed producers grow acres of different cucurbita plants for seed production. What they do is group like with like in widely separated areas – at least 800 or more feet apart. However, cucurbita are pollinated by bees and occasionally an ambitious bee that has been in the zucchini patch makes its way to the squash patch! The result is hybrid seed. It’s impossible to know from the look of the seeds inside the fruit that accidental cross-pollination happened and so the hybridized seed gets mixed into the seed package. When the plant is grown, the result is not as stated on the seed package. Fortunately, this does not happen very often.
The fruit you have is perfectly edible.
Poor fruit set on female flowers can happen when there is a lack of female flowers on the plant and/or poor pollination by bees or insects.
All cucurbits have both male and female flowers on their vines. Male flowers are the first flowers to appear on the plant. It is normal for some of these initial male flowers to fall off – don't be alarmed. Female flowers appear 7-10 days after the male flowers start to appear. The female flowers are identified by what looks like a small fruit where the stem meets the flower. This ‘small fruit’ is missing on the male flowers.
Poor pollination can also be due to a lack of pollinators. Cold, rainy or cloudy weather discourages bees and other insects from flying around to pollinate. Insecticide use in the garden kills pollinators and can be another cause.
If you are using row cover, remove the covers when the plants are flowering to allow pollinating insects to access the plants. Similarly, if you are growing in a greenhouse, open doors and vents to allow pollinators to enter.
You can help pollinate your plants. Using a small brush or q-tip, dab the center of a male flower – these are the flowers with a large anther in the middle which contains the pollen. The pollen will stick to the paintbrush as it would on a bee. Transfer the pollen to the centre of the female flowers. Female flowers lack an anther and have what looks like a small swelling just beneath the flower. Or, you can simply pick a male flower and gently touch the anther to each of the female flowers. Repeat for all of the flowers. It’s best to do this early in the morning as cucurbit flowers open early and only last for one day. Do the pollination before the bees and other pollinators are active!
Research and student activities
An interesting archeological paper about early cucurbit use by Indigenous peoples:
More research:
Organic cucurbit production - Dalhousie University
Managing cucurbit disease - Michigan State University