
Little Green Thumbs (LGT) is a garden-based education program that invites teachers to use their indoor garden as a springboard for investigative, student-centred learning. They've partnered with us to share many of the resources you'll find on this page. If you're a teacher or other caregiver gardening with a child, check out our Gardening with kids page for more! LINK
![]()
Indoor growing methods
Click on the Articles tab in this section for detailed information on a variety of indoor growing methods.
Loading...
Indoor growing timeline
This timeline outlines the most important stages of garden growth. Use this to know what to expect, what to look out for and what you can do to grow your best garden. This timeline is meant as a guide only. Gardens will grow at different rates depending on care and environment. Stages in your garden may last 1 week or up to 2-3 weeks. This timeline mirrors the Teaching Timeline in the Gardening with kids section of this site, which offers activity suggestions and learning inspiration for each stage. LINK
- Stage 0: Planning and preparation
- Stage 1: Garden set-up and location
- Stage 2: Planting pellets and turning on lights
- Stage 3: Germination
- Stage 4: Transplanting into smaller pots
- Stage 5: Liquid fertilizer application
- Stage 6: Transplanting to self-watering containers
- Stage 7: Pinching and pruning
- Stage 8: Trellising and staking
- Stage 9: Flowering and pollination
- Stage 10: Harvest
Toggle through the tabs in this area for in-depth information for each stage.
Before you even begin you need to have a plan in place. Consider the following questions:
- What does your family like to eat?
- Are you planning to grow seedlings only or do you want to produce mature vegetables indoors (or both!)? This will help you focus on how much space and lighting you will need. See our suggested set up for examples. LINK
- If you want mature vegetables, what grows well indoors? LINK
- What makes sense to buy in the store and what is practical to grow? Some key points: for production volume, microgreens and lettuce are quick and prolific. If you use a lot of expensive herbs or difficult to source vegetables, they might be more practical for you to grow rather than purchase. If you're planning to produce and preserve ongoing, herbs and green onions are practical choices.
- What brings you joy to grow but might not be a practical choice? Some produce may be cheaper to buy indoors, but gardens can meet emotional needs too. Cherry tomatoes are a good example of something that's probably more practical for most of us to purchase but many people still enjoy growing them indoors.
- What is your budget? If you have few or no lights, your options are more limited. The remainder of this section focuses on growing under lights. See our Growing indoors with natural light section if you don't have lights. LINK Even inexpensive flourescents (think shop lighting) can help if budget is a big issue. Purchasing fancy pots and trays can get expensive very quickly and are often easily replaced with repuroposed or recycled materials as long as you provide drainage holes.
Stage 1: Garden Set-up and Location
Garden Care
Find a suitable location in your classroom where your garden can have a dedicated light socket. Avoid using extension cords for garden Version 1 (MH light bulb and cooling tube) and ensure that extension cords used for Version 2 have at least an 18 gauge.
Change in the garden
Your shelving unit will now be set up!
Potential issues
Choosing a location which has a cold draft could negatively affect your garden. Remember, the window is not always the best location for your garden if there is a warmer location in your room. Remember to discuss with your custodian where the garden could be placed to ensure it is not disrupting regular cleaning.
Stage 2: Planting Pellets & Turning on Lights
Garden care
At this stage you will soak and expand your pellets and plant seeds. Although your garden seeds do not require light to germinate, you can get your light and timer ready for when your seeds sprout. You may choose to plant your bean and pea seeds directly into self-watering containers, rather than into pellets. You can plant your lettuce directly in to trays.
Change in the garden
Your pellets are now hydrated, planted and waiting to sprout!
Potential issues
Ensure that the growing media holding your seeds stays moist and warm. Use a dome covering over your planting trays to conserve moisture. Remove the dome once seeds sprout.
Stage 3: Germination
Garden care
As seeds sprout, remove the dome cover on your planting trays and ensure that your plants are under grow lights. Set your timer for 12 hours of light and 12 hours of dark. Ensure that your grow lights are placed at an appropriate height above your plants (4” for LED and fluorescent, 12-20“” for MH bulbs).
Change in the garden
At this stage your seeds are starting to germinate (sprout) and poke out of the soil.
Potential issues
Ensure that the grow lights are not too high above your plants or else your plants will reach and become leggy. You want to encourage compact growth. Seeds at this stage are very susceptible to uneven watering, so ensure growing media is kept moist but not soaking wet. If you notice that any of your seedlings are falling over and wilting, look up ‘damping off’ in Troubleshooting for diagnosis.
Stage 4: Transplanting into smaller pots
Garden care
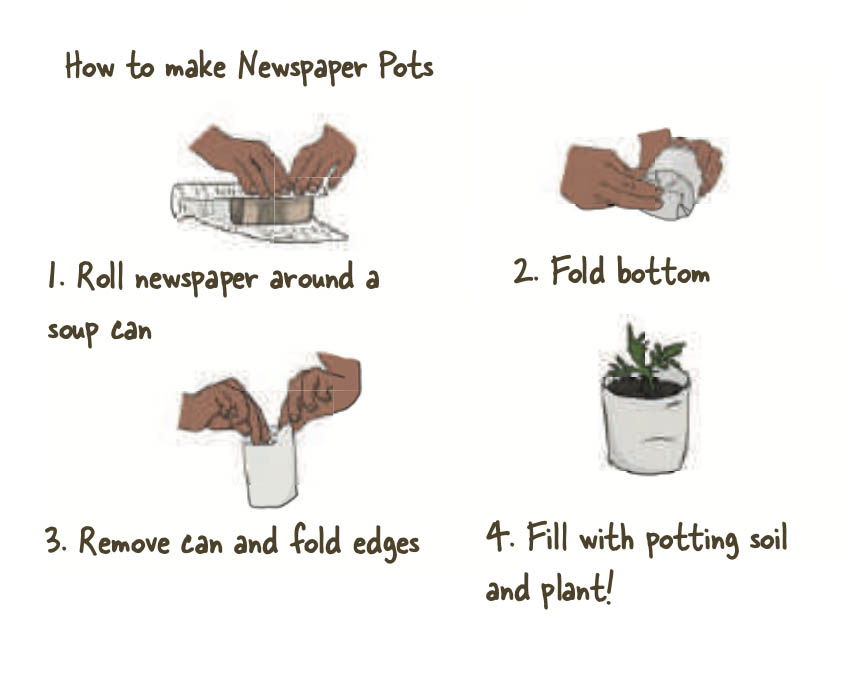
At the sight of your seedlings’ first true leaves, your seedlings will be ready to transplant into small pots. These can be plastic 4” pots or you can make your own newspaper pots. Transplanting will help with moisture retention, as pellets dry out very quickly. You may also continue growing in your pellets until they reach 3-4 sets of true leaves. Be sure to cut or tear one side of your pellet before planting as a precaution to ensure roots can get through.
Change in the garden
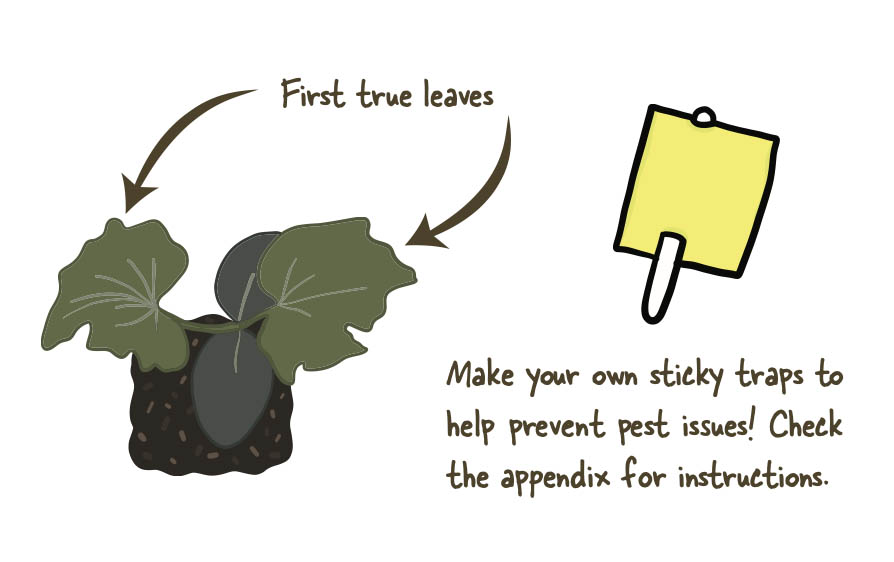
At this stage you will see a seedling’s ‘first true leaves’. This is the second set of leaves on a seedling, which come after the ‘seed leaves’.
Potential issues
Take care if transplanting peas. They have very fragile root systems and do not like being trans- planted. Ensure that you have patted down the potting soil, and that the peat pellet and potting soil have good contact.
Stage 5: Liquid Fertilizer Application
Garden care
Once your seedlings have established their first true leaves, you can begin fertilizing seedlings with a half-strength dilution of liquid fertilizer. You will only need to fertilize your seedlings once per week with this solution until you transplant into your growing containers. If your liquid fertilizer calls for 7 drops per liter of water, dilute to 3 drops of fertilizer per liter of water. You can use this to fertilize smaller pots as well as pellets. You can avoid fertilizing nasturtium seeds, as they prefer less nutrients.
Change in the garden
At this point, your seedlings will continue growing new sets of true leaves. You will want to continue raising your light to keep it at the proper distance above your plant canopy.
Potential issues
Take care not to fertilizer more than once per week at half-strength only.
Stage 6: Transplanting to Self-watering containers
Garden care
Fill your growing containers with soil-less growing media. Add your dolomite lime and fertilizer and mix well. Some LGT teachers choose to substitute fertilizer with vermicompost, either whole or partially. Water your seedlings well after you transplant them and then fill the bottom water reservoir of your planting containers. Remember to keep your water reservoirs filled with water!
Change in the garden
Your seedlings will have grown 3-4 sets of true leaves and will be ready for transplanting into your growing containers.
Potential issues
If your growing containers do not have wheels, ensure they are in place before filling with soil and water, as they are heavy once filled. Be careful not to disturb plants’ roots while trans- planting. Cover the top of your seedling plugs completely by potting soil, or your seedlings can dry out more quickly. If your water reservoirs in the bottom of your growing containers dry out completely, your soil can lose its wicking abilities (think of a sponge that has completely dried out). Make sure the reservoirs stay full! If you notice potting soil is staying too water-logged, you may have used a potting mix too heavy in organic matter. Now is a great time to place sticky traps in your garden as a warning sign for pests. Assign students to check daily!
Stage 7: Pinching and Pruning
Garden care
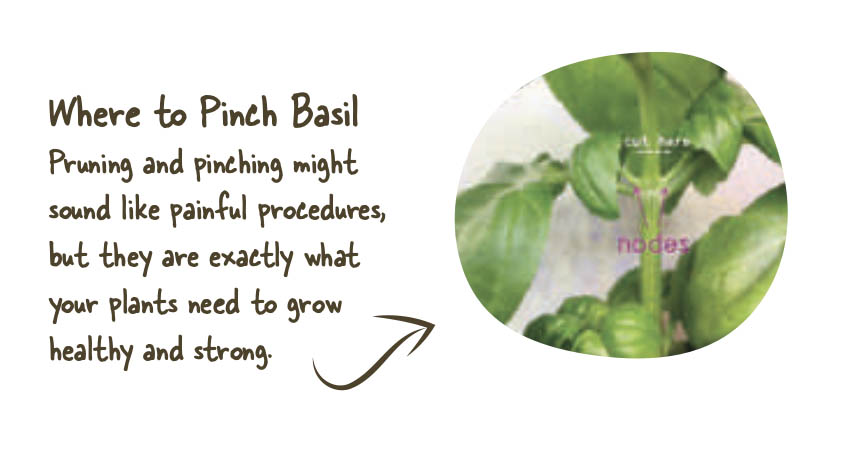
We encourage teachers to pinch their basil to encourage branching. This is the removal of the tips of the plants to divert the plant’s energy. This same practice can be done with peppers. Although the tomato varieties in an LGT variety do not require pruning to set fruit, you can prune tomato plants to encourage bushier growth or to create more airflow as plants grow larger.
Change in the garden
All of your plants are now growing in your self-watering containers. Most seedlings will now have grown at least 6-8 sets of leaves. Basil may be starting to grow tall and leggy.
Potential issues
When pinching plants, ensure that they have at least 6 sets of leaves. Never remove more than 1⁄4 of the plant when pruning or pinching. If basil is not pinched, it may grow up past LED or Fluorescent lights, or set seed too quickly.
Stage 8: Trellising & Staking Vegetables
Garden care
Ensure that your peas have been propped up with sticks and that your pole beans have found their trellis. You may also choose to train your cucumber onto a trellis. If your cucumbers are growing vertically out of the light, you can gently retrain them to grow vertically on the trellis. Your tomato plants do not require trellising or staking, though it may be helpful to use a stake to prop up your tomato if it is flopping over. This is a great time to use an oscillating fan on your garden to promote air circulation. Set for 4 hours daily and monitor its effects.
Change in the garden
You garden should be growing well, with many plants nearing mature size. Some plants may be starting to get crowded.
Potential issues
Crowding plants can lead to stunted growth or moisture build-up and lack of airflow that can lead to disease or encourage pests. Remember to prune leaves that are too close to one another and stake plants upright if needed.
Stage 9: Flowering & Pollination
Garden care
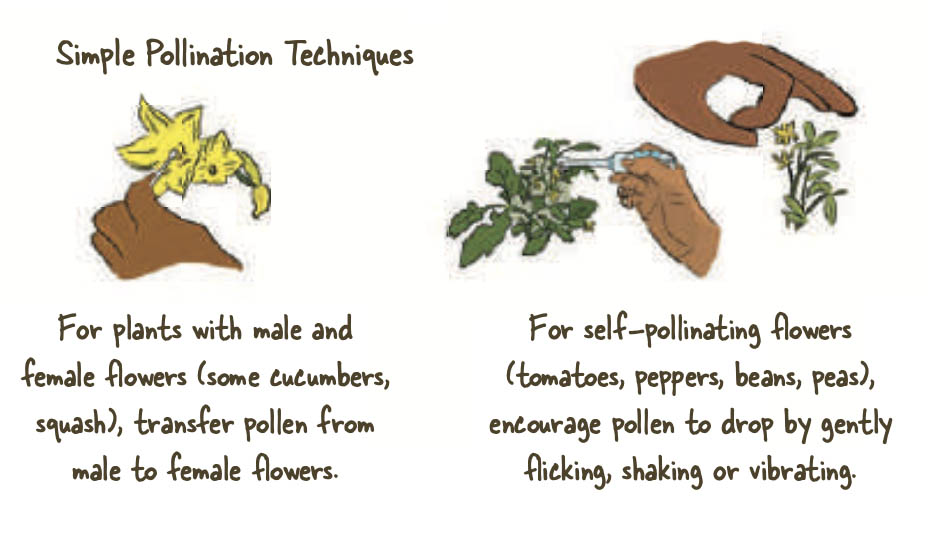
As you begin to see blooms on your peppers, beans, peas and tomatoes, you can give them some help pollinating. These are all self-pollinating flowers, so they contain both male and female parts. You can give the flowers a little flick or shake the plant stems to help pollen to fall into the stigma. If you are growing cucumbers, you may NEED to pollinate when growing indoors, as they often have male and female flowers. The seeds given in our LGT packs are self-pollinating cucumbers, so they don’t need to be pollinated (all female flowers).
Change in the garden
You will begin to see flower blooms in your garden.
Potential issues
If you are seeing plants flower and then not fruit, this could be a pollination issue or a cool temperature issue. A lack of flowering can be due to over fertilization, in which a plant has directed its energy into green growth. To inspire flowering in your plants, you may decrease your light dura- tion by a half hour every 3-4 days, stopping at 9-10 hours of light.
Stage 10: Harvest
Garden care
Different plants in your LGT garden will be ready for harvest at different times. You may harvest lettuce and herbs throughout the year, will probably see peas and beans first, followed by tomatoes, cucumbers and peppers.
Change in the garden
You should now see your plants coming to maturity and some plants will be fruiting. As plants mature, you may harvest. This may leave bare spots in your garden that you can replant if you choose. Fast growing crops like lettuce, radishes or herb cuttings are a good choice for the end of your growing season.
Potential issues
Ensure that when harvesting, you cut the stem or vine of the plant. Don’t tug! You could pull the plant out of the soil. Try to harvest with a small part of the stem attached, as this will aid in storage.
Potting mix and soilless media
Soilless mixes are not soils and typically contain few nutrients. Growing in them is sort of like growing in a hydroponic system - unless compost or other fertilizers have already been added, you're going to need to provide appropriate fertility to growing plants on an ongoing basis. Soilless mixes are usually made from a large proportion of peat moss which is often mixed with
Their light weight and ability to hold water like a sponge makes soilless mixes the go-to choice for containers. However, they are not permanent and don't belong in raised beds. Read the contents on your potting mix bag, add compost or other fertilizers if necessary, and make sure you change out the potting mix in your pots every three to five years to keep your plants healthy!
Click on the Articles tab in this section for detailed information on a variety of potting and soilless mix topics.
Loading...
Houseplants
Here are some cool houseplants.
Click on the Articles tab in this section for detailed information on a variety of houseplants.
Loading...
Growing vegetables indoors
Growing vegetables indoors can be simple and inexpensive. You may not even need supplemental lighting! The basic methods for growing food indoors are similar to growing houseplants though we do recommend to always start with fresh potting mix when growing edible plants to reduce disease concerns. Once you harvest your bounty, you can reuse your old mix in your non-edible houseplants, in outdoor flower containers, or compost it.
Click on the Articles tab in this section for detailed information on a variety of indoor vegetable topics. Also be sure to check out our vegetable pages for detailed growing information by vegetable.
Loading...
Common problems
Loading...